Daily Tasks Guide - How To Do Daily Tasks
- How to Start or Create a New Project | Step-by-Step SOP
- SOP – Fiverr Website Project Task Creation (ClickUp & Discord)
- How to Upload Project Changes | Step-by-Step SOP for Smooth Updates
- How to Properly Update Past Client Changes - Documentation Issue
- Project Status: How to Update and Maintain
- Fiverr Delivery Message SOP (Full-Proof)
- Revisions SOP
- Best Practices and Key Points for Website Transfer and Project Completion
- SOP – Proper Project Completion & Client Handover
- Guide on steps after project automatic completion
- SOP – Client Referral System (Post-Project)
How to Start or Create a New Project | Step-by-Step SOP
Purpose
This SOP outlines the step-by-step process for uploading a new client project. It ensures that every project is properly documented, organized, and tracked from the beginning, maintaining consistency and data security across all team members.
1. Requirements Checklist
Before starting the project upload process, make sure you have collected the following items from the client:
-
✅ Inspirational Website(s) (reference links or design examples)
-
✅ Logo (in PNG, SVG, or vector format)
-
✅ Content (text, images, and any brand material)
-
✅ Login Details (WordPress, hosting, domain, or cPanel)
-
✅ Total Pages and Their Names (complete sitemap if available)
-
✅ Any Specific Notes (special requests, colors, fonts, or functionality)
Ensure all of these materials are complete before proceeding.
2. Project Uploading Steps
Step 1: Create a New Project in ClickUp
-
Open ClickUp and create a new task/project.
-
Use the following naming format:
Client Name (Country)
(Example: John Smith (USA)) -
Add the project under the appropriate workspace or list (e.g., “Active Projects”).
Step 2: Create a Folder in Google Drive
-
Log in to the official SMTP Drive account (company-managed Google Drive).
-
Create a new folder using the same name as the ClickUp project.
(Example: John Smith (USA)) -
Copy the folder link and paste it in the ClickUp Description section — as shown in the reference photo.
-
This folder will contain all client files, media, and communication records.
Step 3: Collect and Upload All Client Data
-
Take screenshots of all client chats, including conversion and order chat.
-
Download all images, videos, documents, and other files shared by the client.
-
Upload everything to the client’s folder in the SMTP Drive account.
-
Double-check that all files are uploaded correctly and organized in labeled subfolders (e.g., “Logo,” “Content,” “References”).
Step 4: Create a Subdomain for the Project
-
Create a new subdomain using the same name used in ClickUp.
(Example: johnsmith.youragencydomain.com) -
Upload the project files or WordPress installation to this subdomain.
-
Paste the subdomain link in the ClickUp Description section below the Drive folder link (as shown in the reference photo).
Step 5: Add Client Login Details
-
Add the client’s login credentials (WordPress, hosting, or domain) to the Client Login List spreadsheet or document.
-
Ensure the credentials are stored securely and accurately.
Step 6: Add Inspirational Website Links
-
At the bottom of the ClickUp description section, paste the inspirational website links shared by the client.
-
Follow the same structure shown in the reference photo to maintain consistency.
Step 7: Update Discord Activity Section
-
Go to the Discord Activity channel.
-
Send all important links that are difficult to copy from screenshots (e.g., Drive folder, subdomain, or project file links).
-
If a meeting was held with the client, also send the meeting link and notes to the Discord Activity section for tracking.
Step 8: Update Project Information in ClickUp
-
Update the order date in ClickUp if the order is still in progress.
-
Set the priority tag following the Order Tag SOP.
-
Update the status of the project according to the Order Status SOP.
Important Notes
-
Always use the same description format inside ClickUp as shown in the reference image.
-
Ensure all uploaded materials are stored under the official SMTP Drive account only.
-
Maintain a professional and organized structure for every project — no personal accounts or local storage should be used.
-
Double-check all links (Drive, subdomain, etc.) before marking the project as uploaded.
SOP – Fiverr Website Project Task Creation (ClickUp & Discord)
🎯 Objective
Create a single, repeatable system for setting up Fiverr website projects in ClickUp so no critical detail is missed and every team member works from the same source of truth.
🧱 Scope
This SOP applies to all Fiverr website development projects without exception.
🛠️ Tool Used
- ClickUp (Task Template: Client's Fiverr Username – Project Type)
🧭 Step-by-Step Process (With Screenshots)
Follow these steps in the same order every time. Insert the relevant screenshot under each step when documenting.
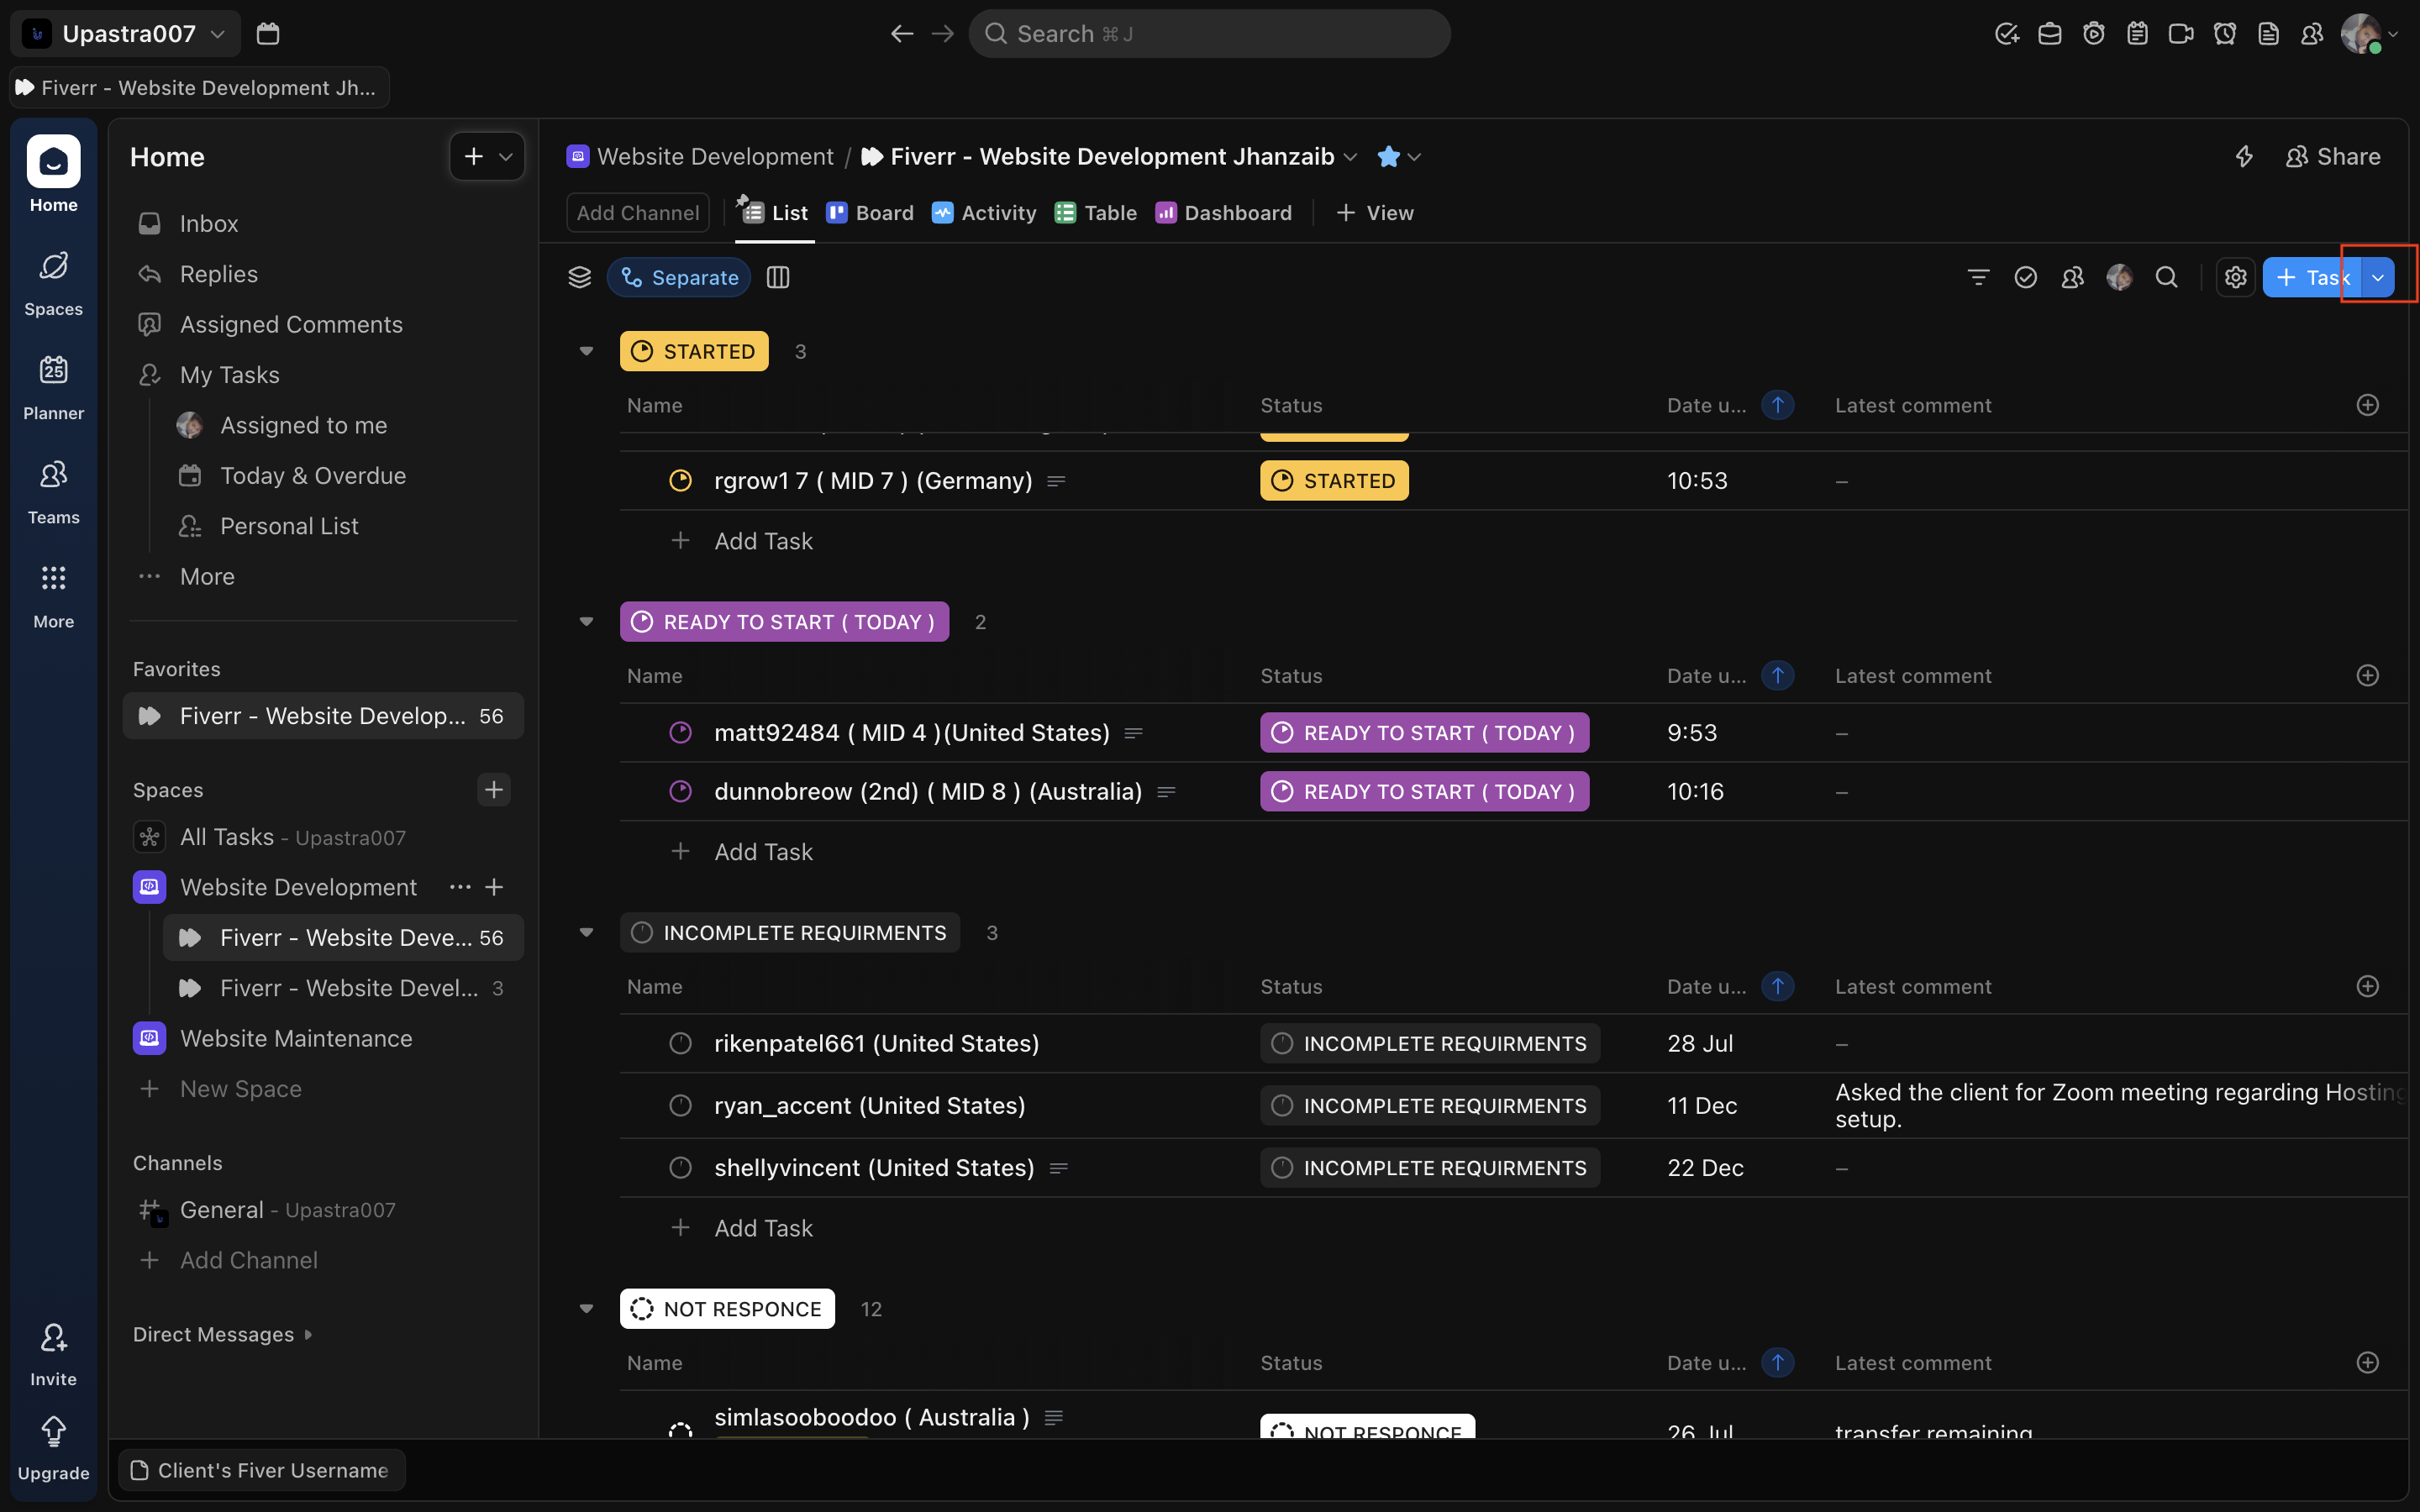
🔹 Step 1: Click + Task
- Go to the correct Fiverr Website Development list
- Click + Task (top-right)
Screenshot: Task button highlighted
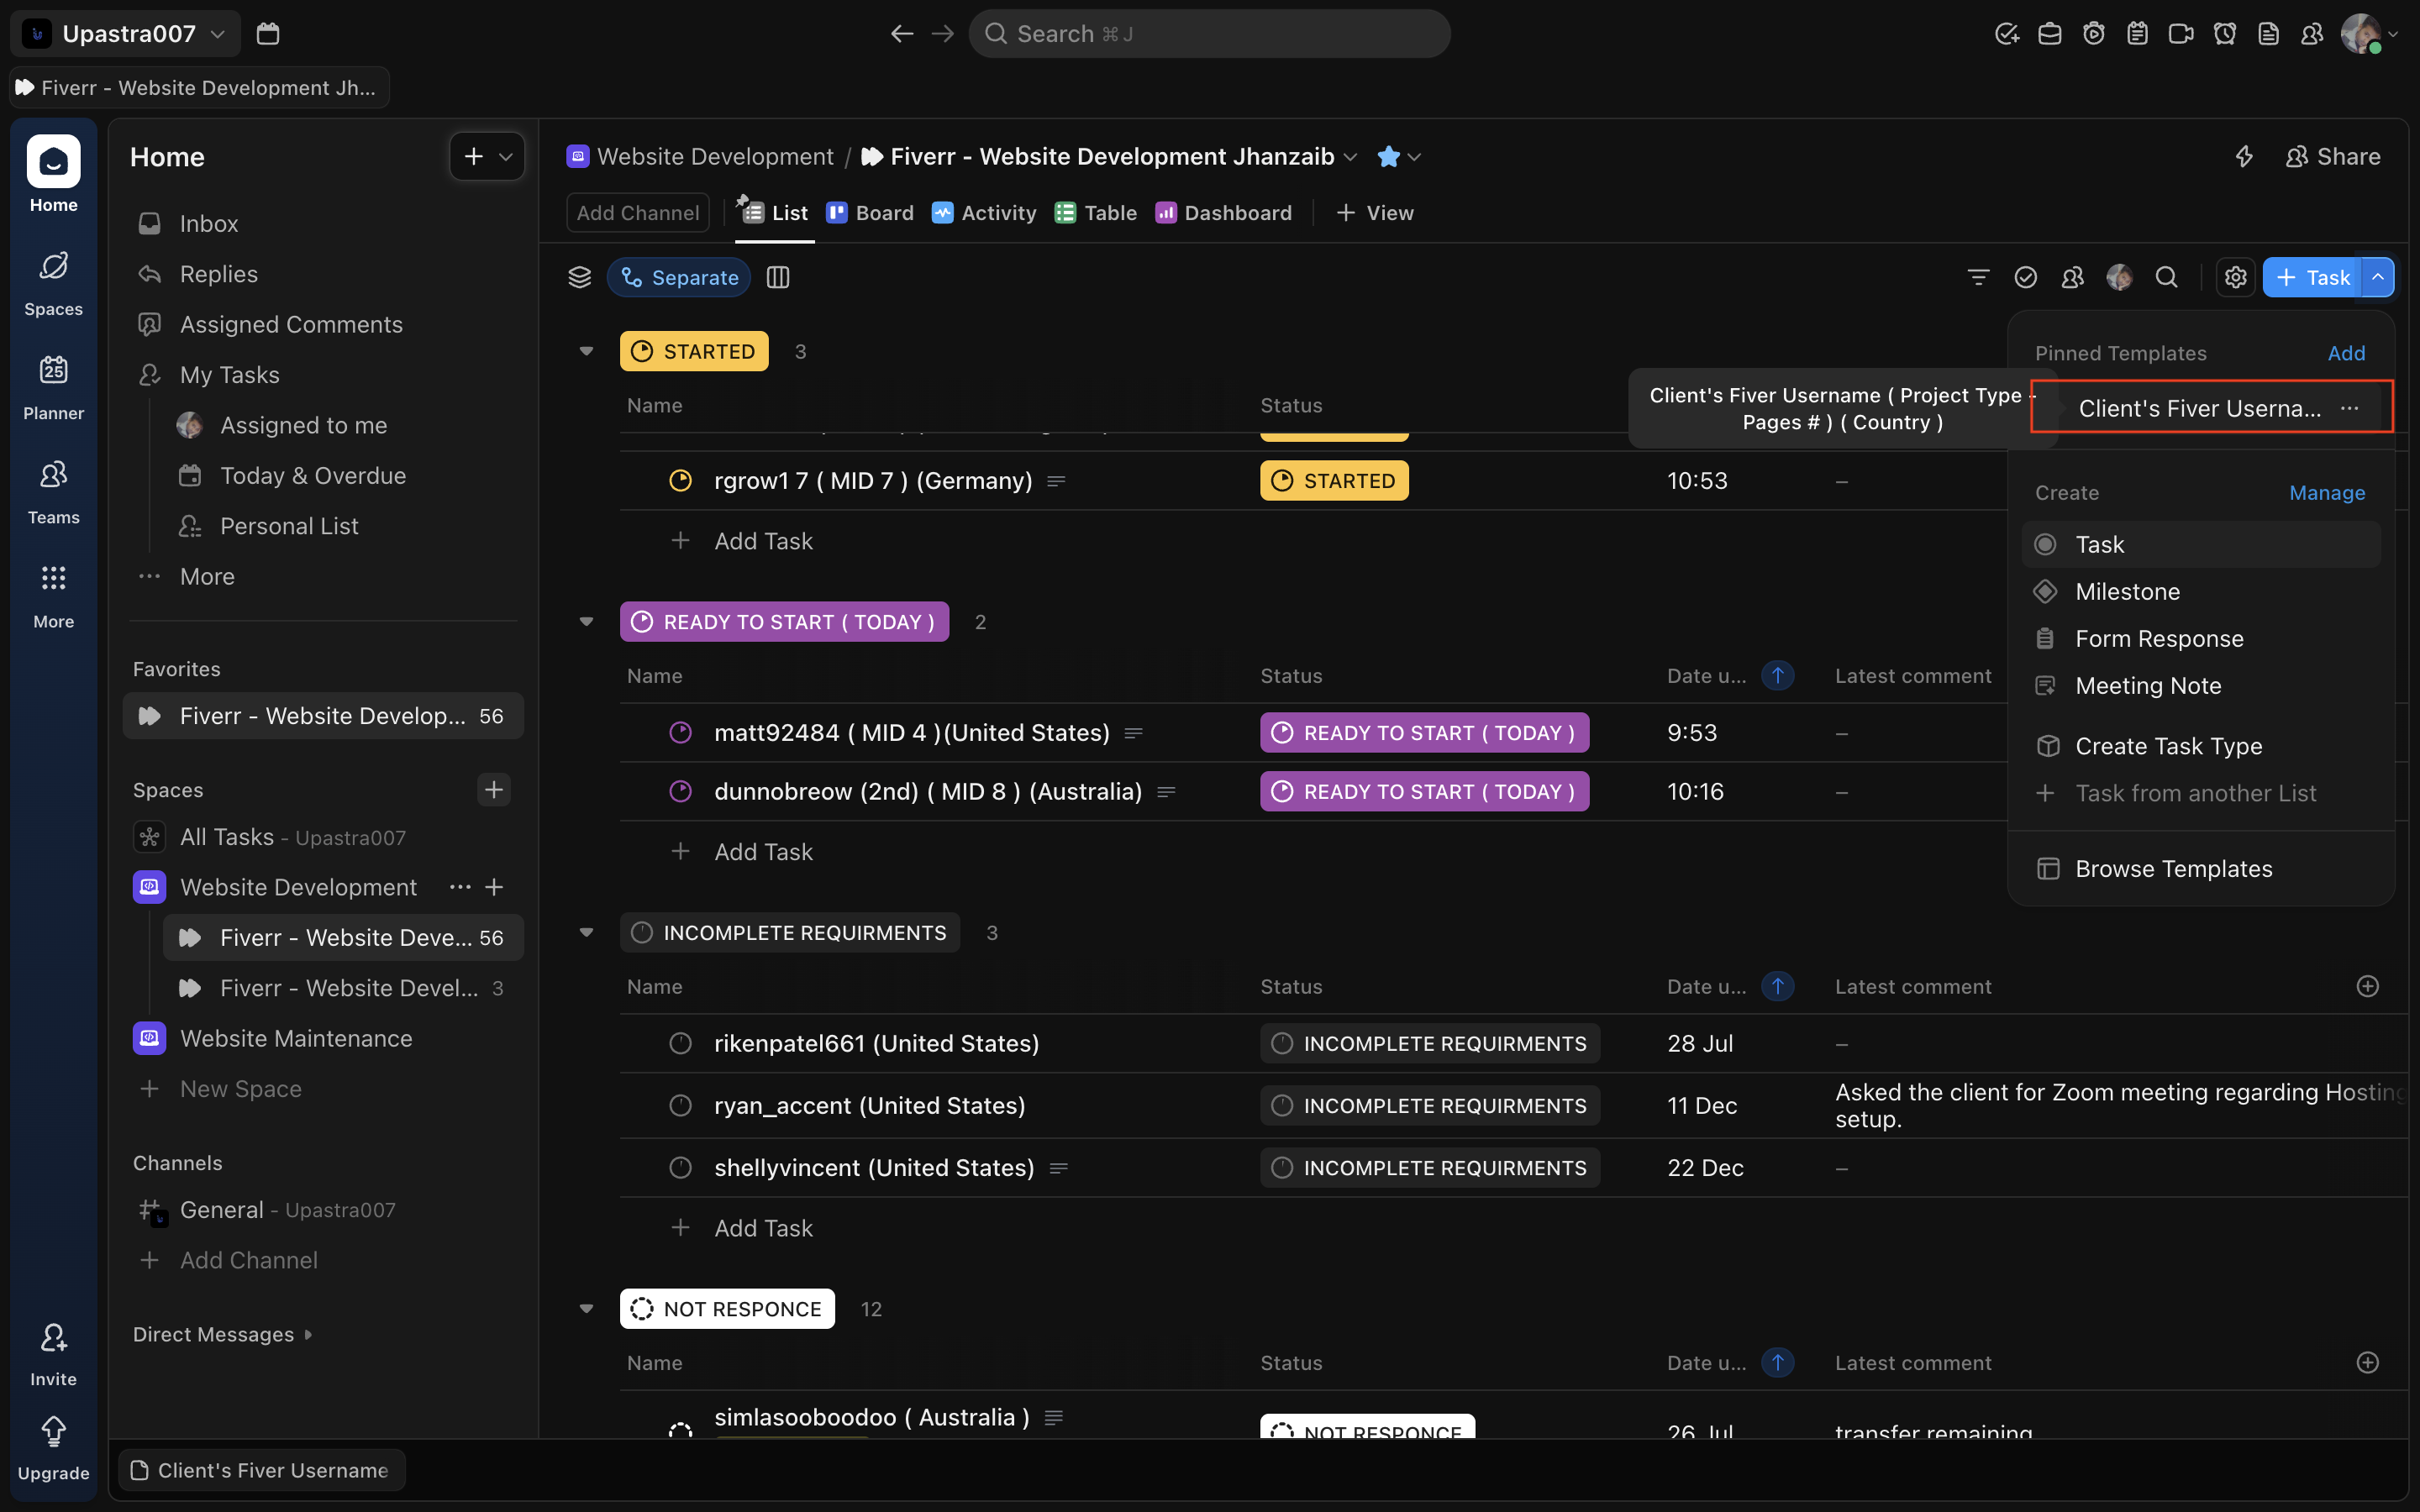
🔹 Step 2: Select the Approved Task Template
- From Pinned Templates, select:
Client's Fiverr Username ( Project Type – Pages # ) ( Country ) - Do NOT create a blank task
Screenshot: Template selection dropdown
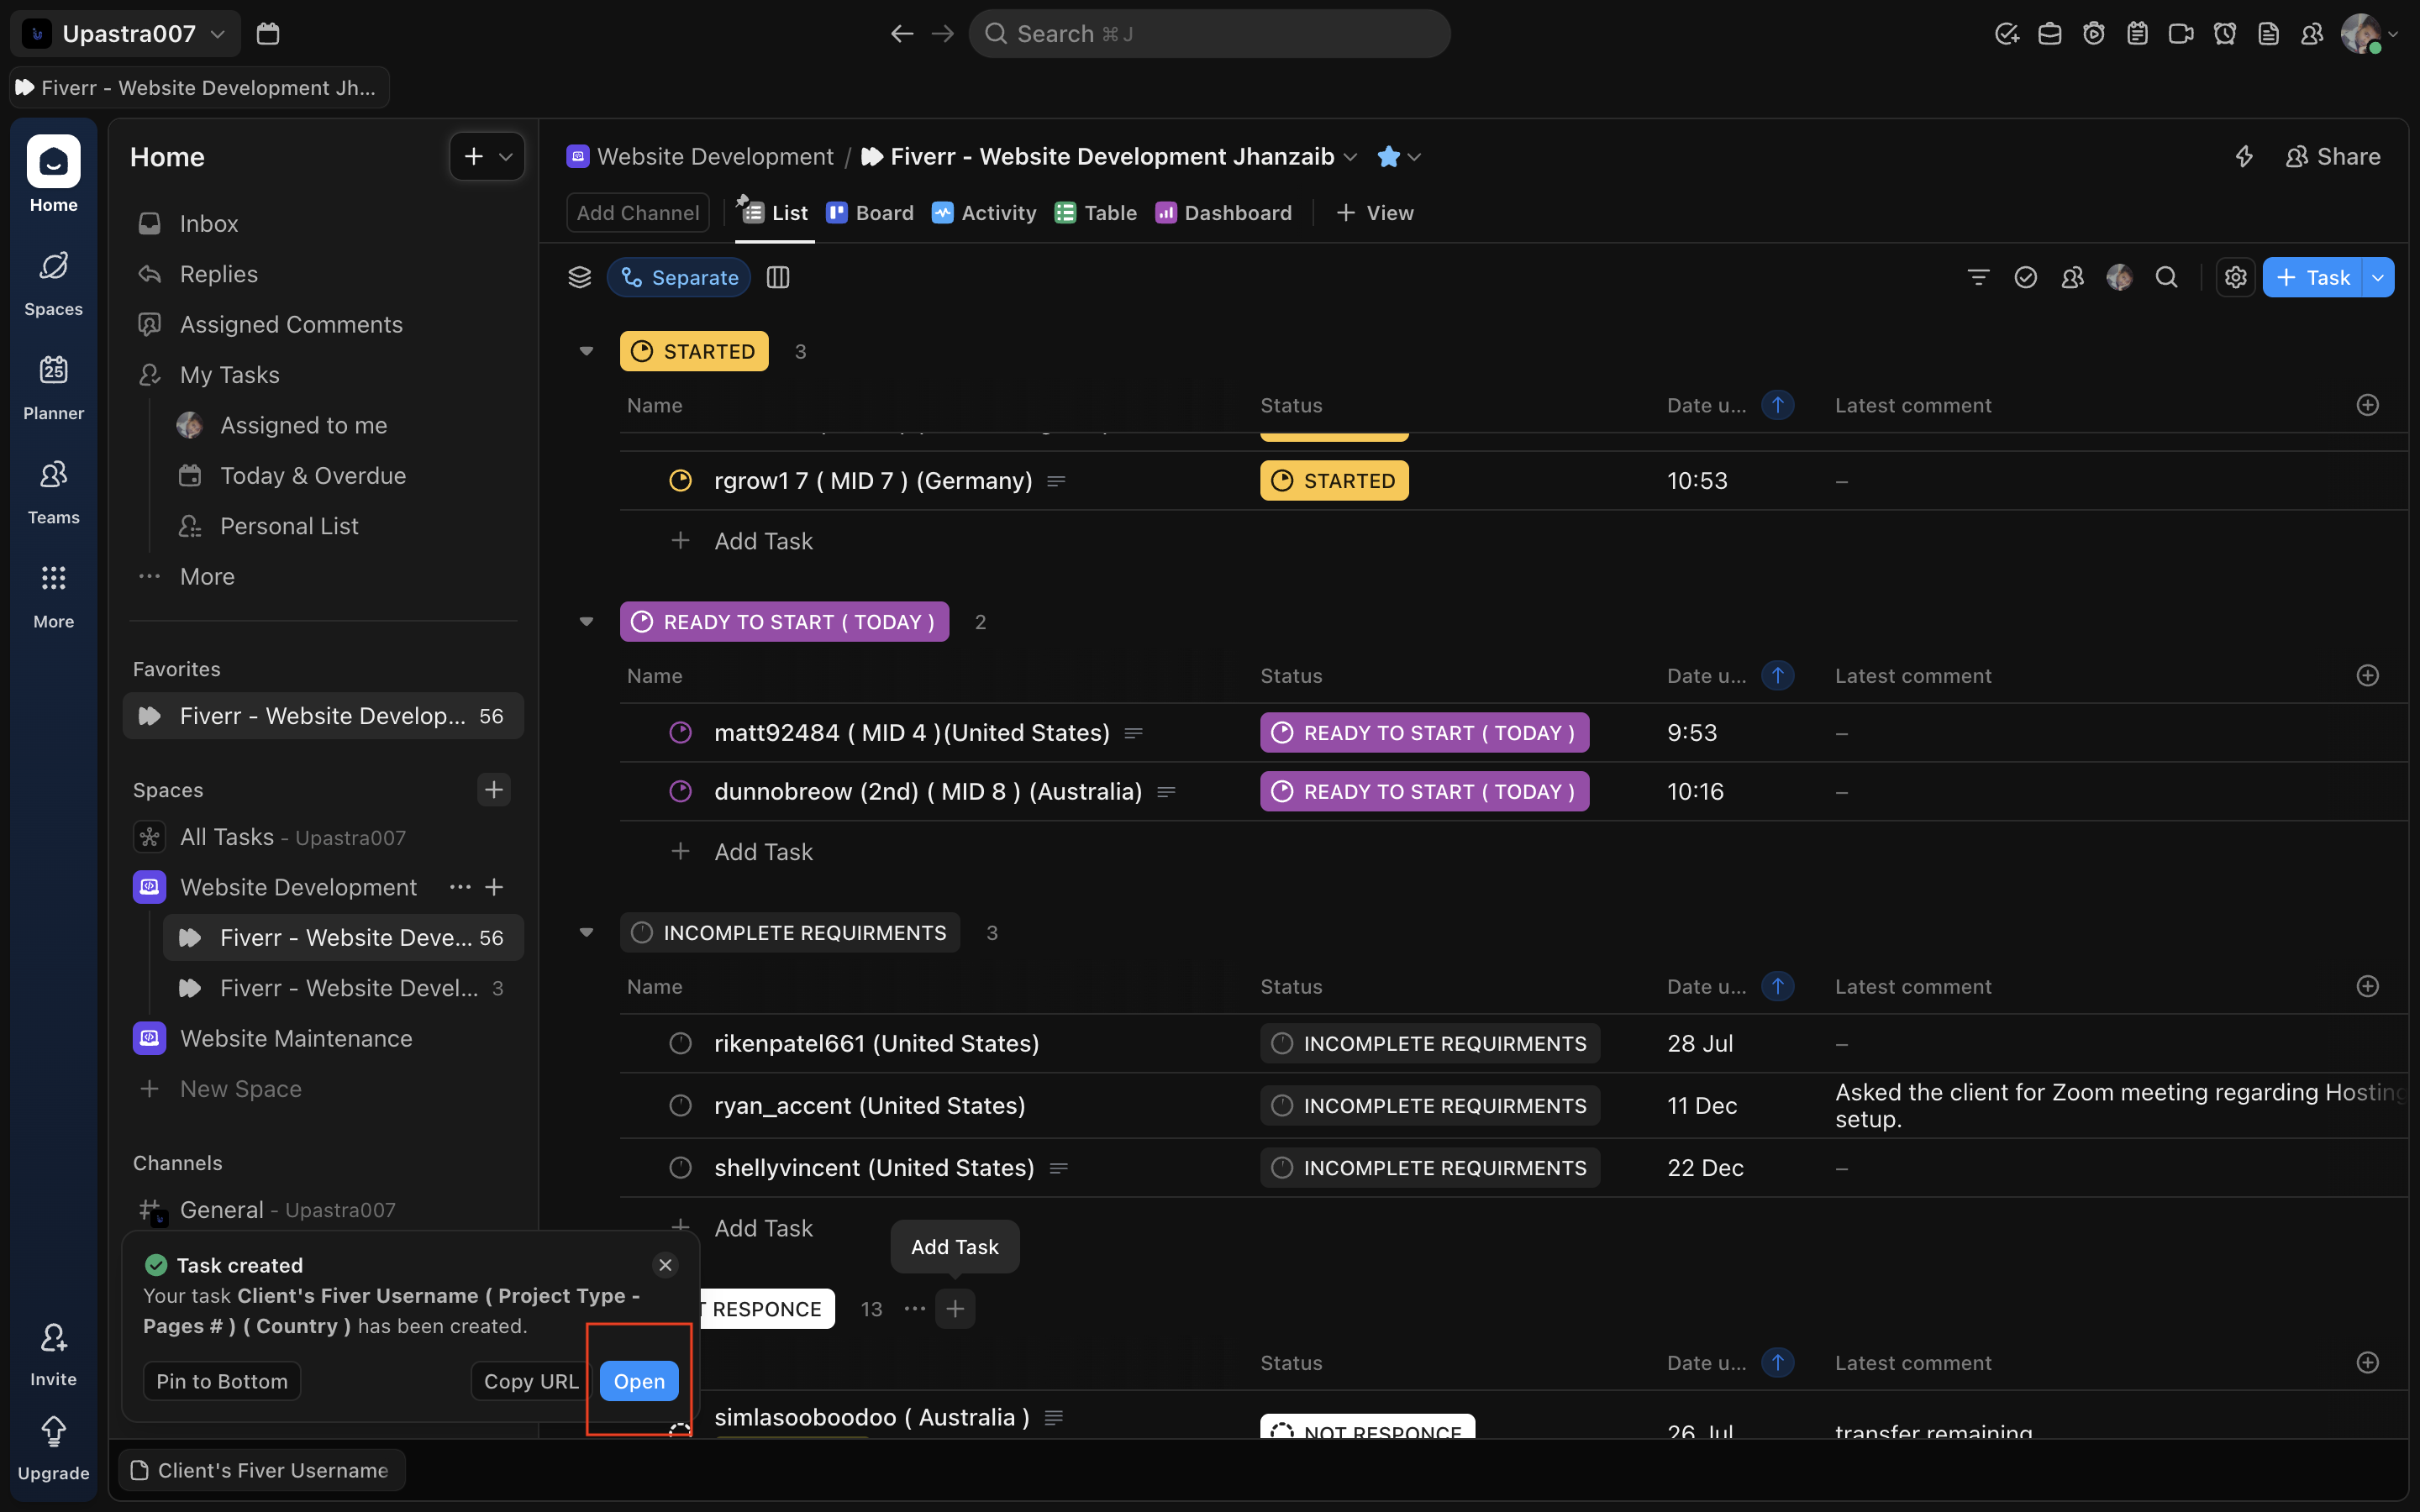
🔹 Step 3: Open the Newly Created Task
- Once the task is created, click Open
- You must complete all required fields before moving the status
Screenshot: Open task button
🔹 Step 4: Rename the Task (Mandatory)
Rename the task using this exact format:
Client’s Fiverr Username ( Project Type – Pages # ) ( Country )
Example:
johnsmith123 ( Project Type ( Need to be Added by Project Manager ) – 5 Pages) (United States)
Screenshot: Task title edit

🔹 Step 5: Add Google Drive Link
Under Project Files & Chat:
- Paste the main Google Drive folder link
This folder is the single source of truth for:
- Assets
- Credentials
- References
🚫 No Drive link = task is NOT started
Screenshot: Drive link field
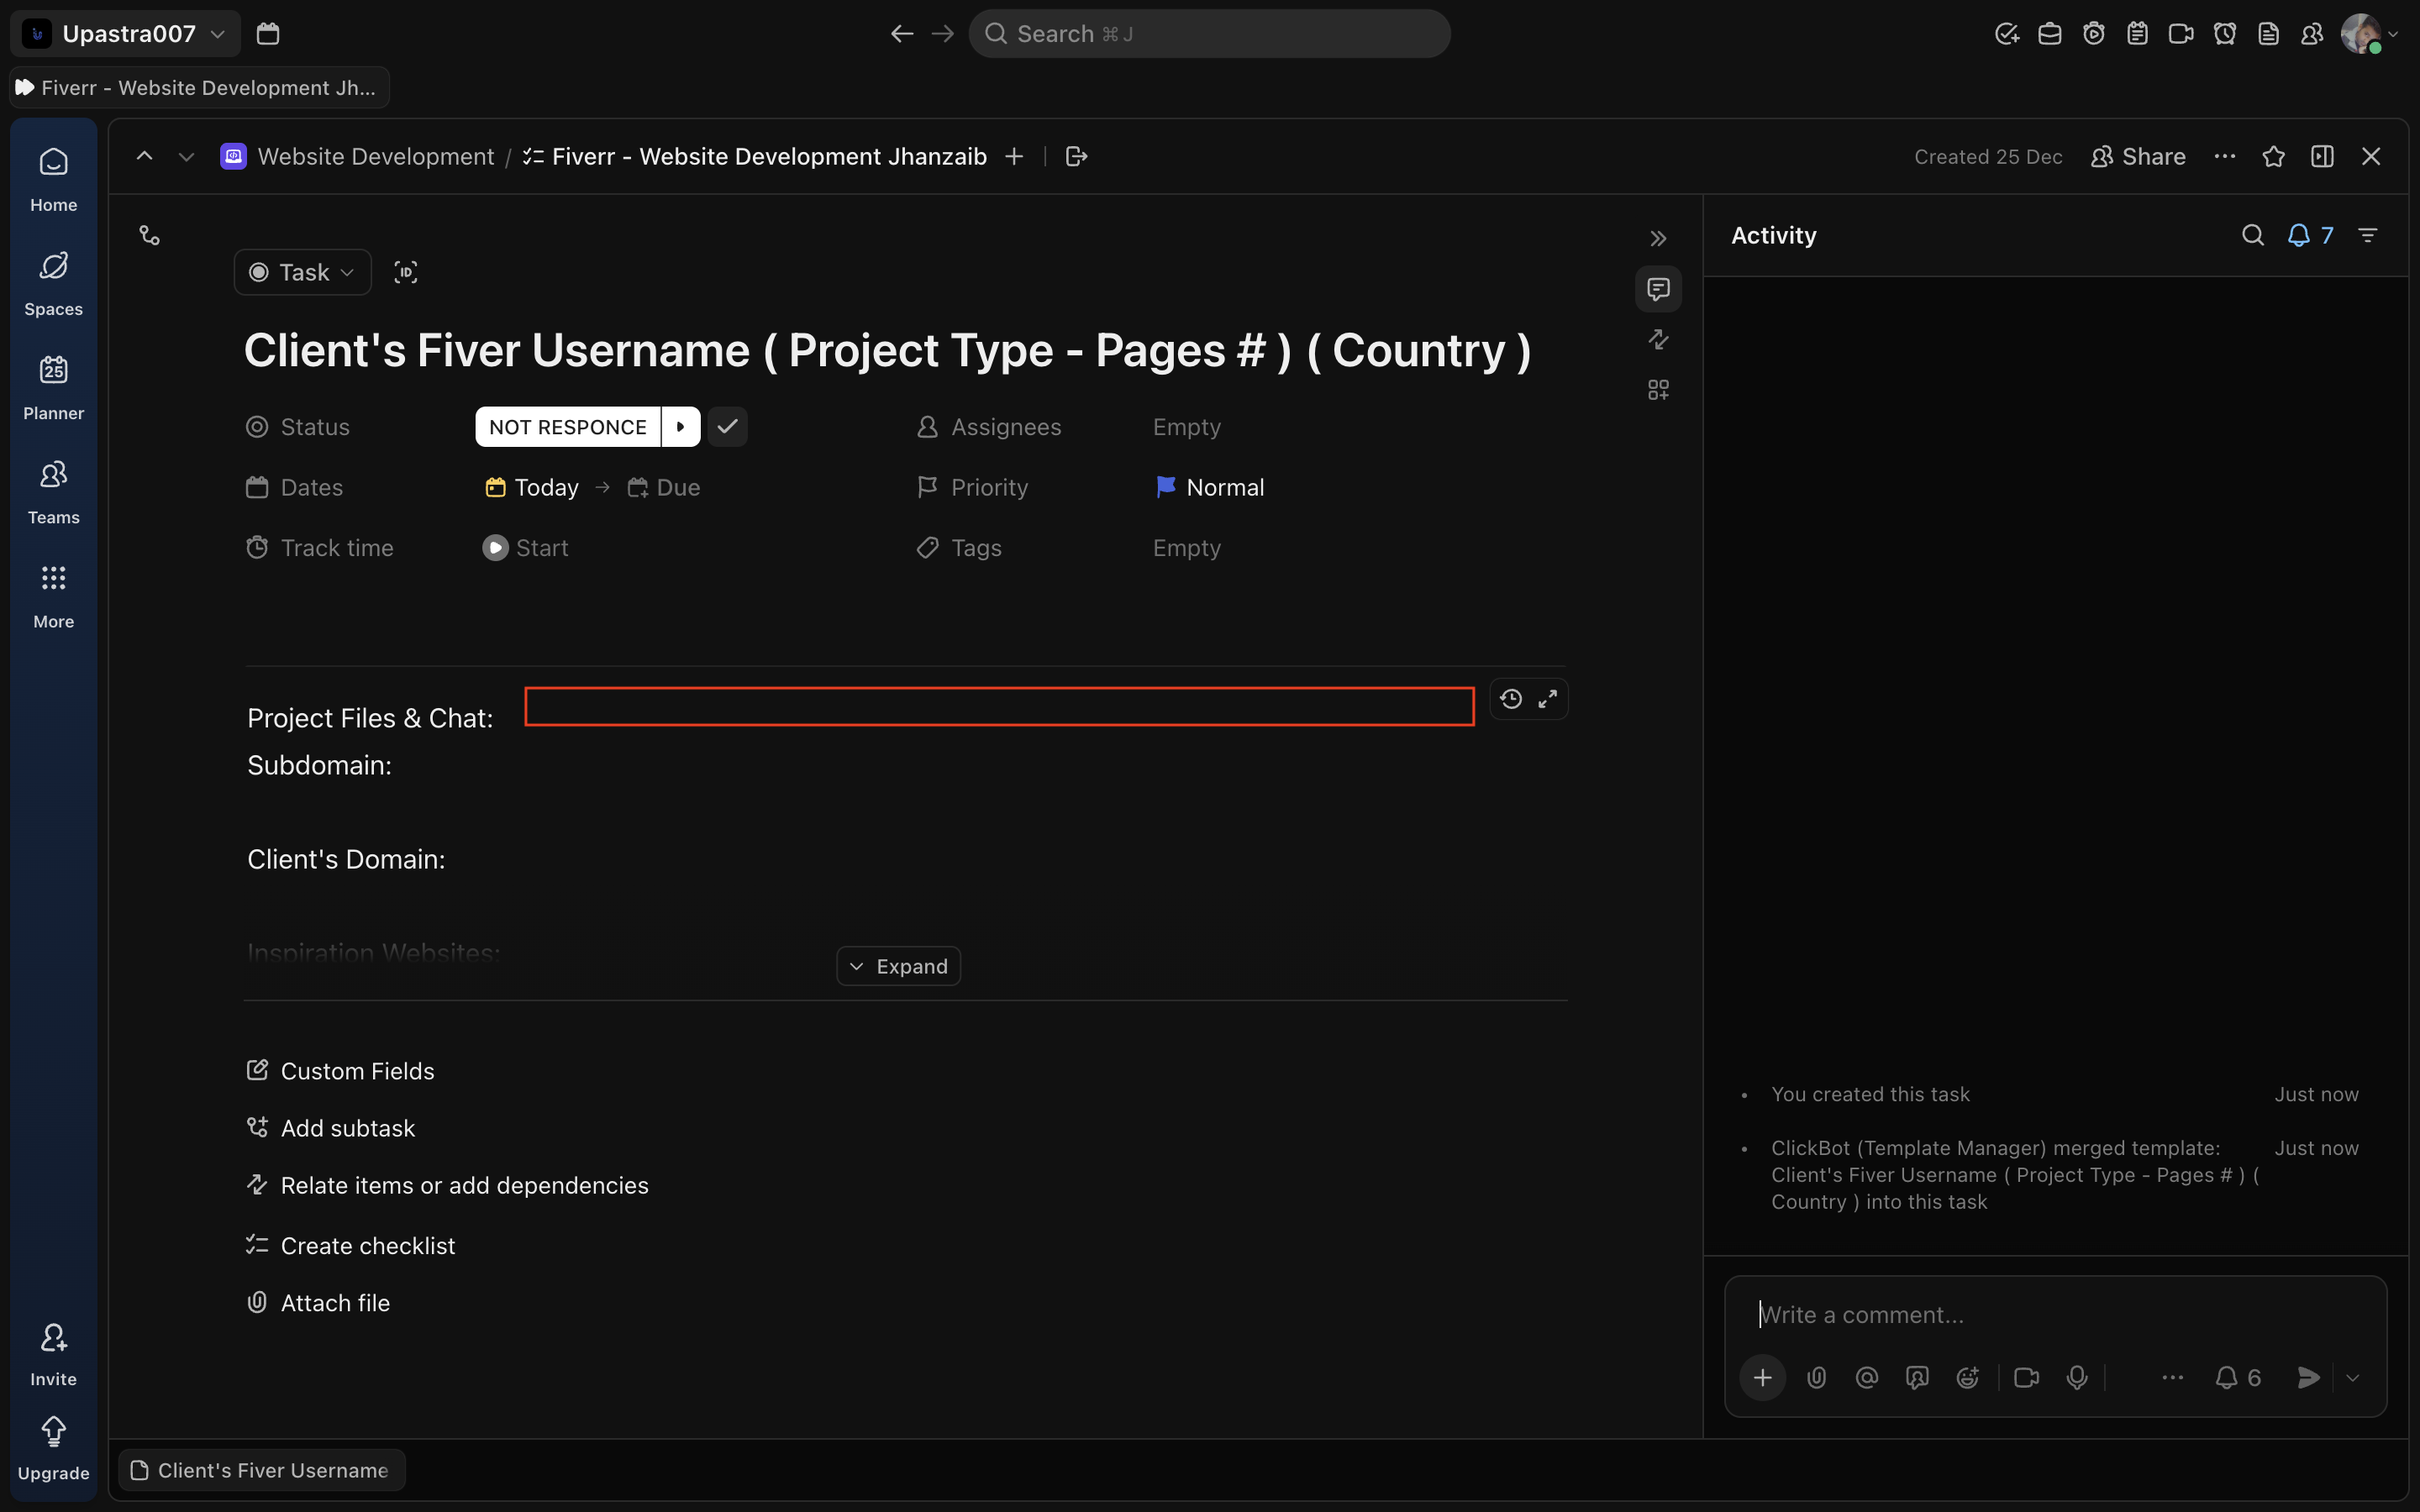
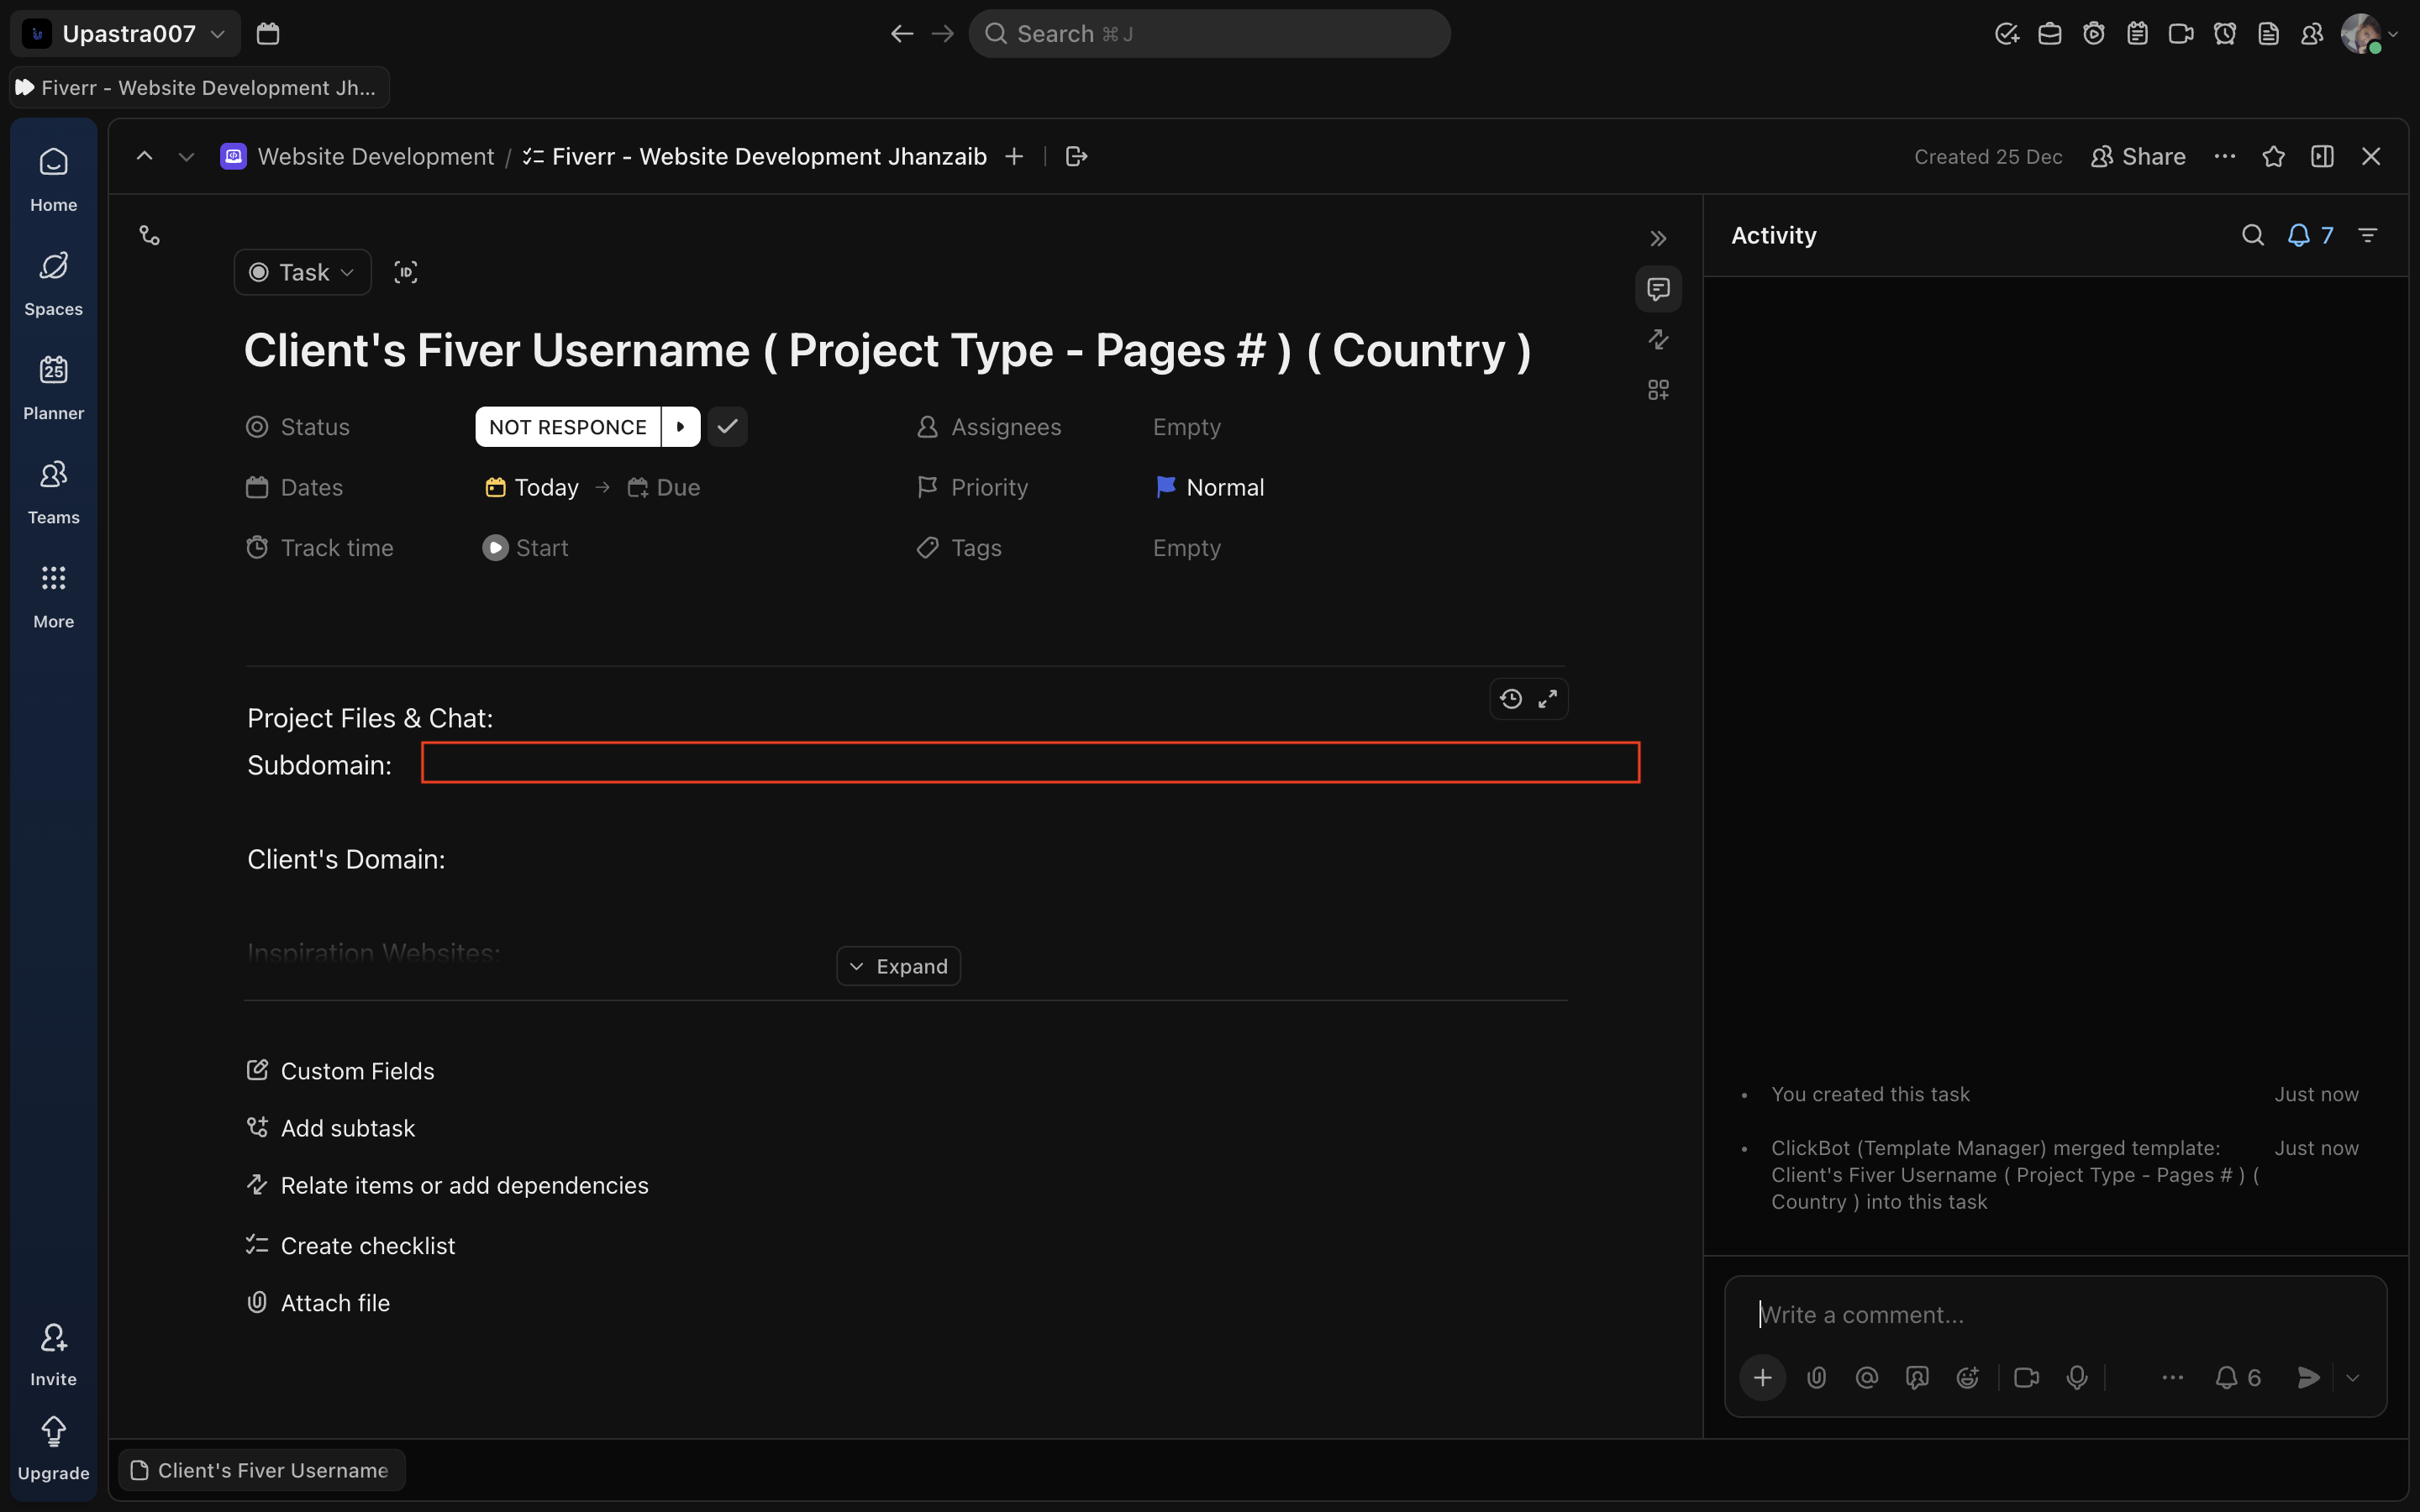
🔹 Step 6: Add Subdomain
Under Subdomain:
- Add the development subdomain once created
Example:
clientname.jehanzaib007.com
Screenshot: Subdomain field
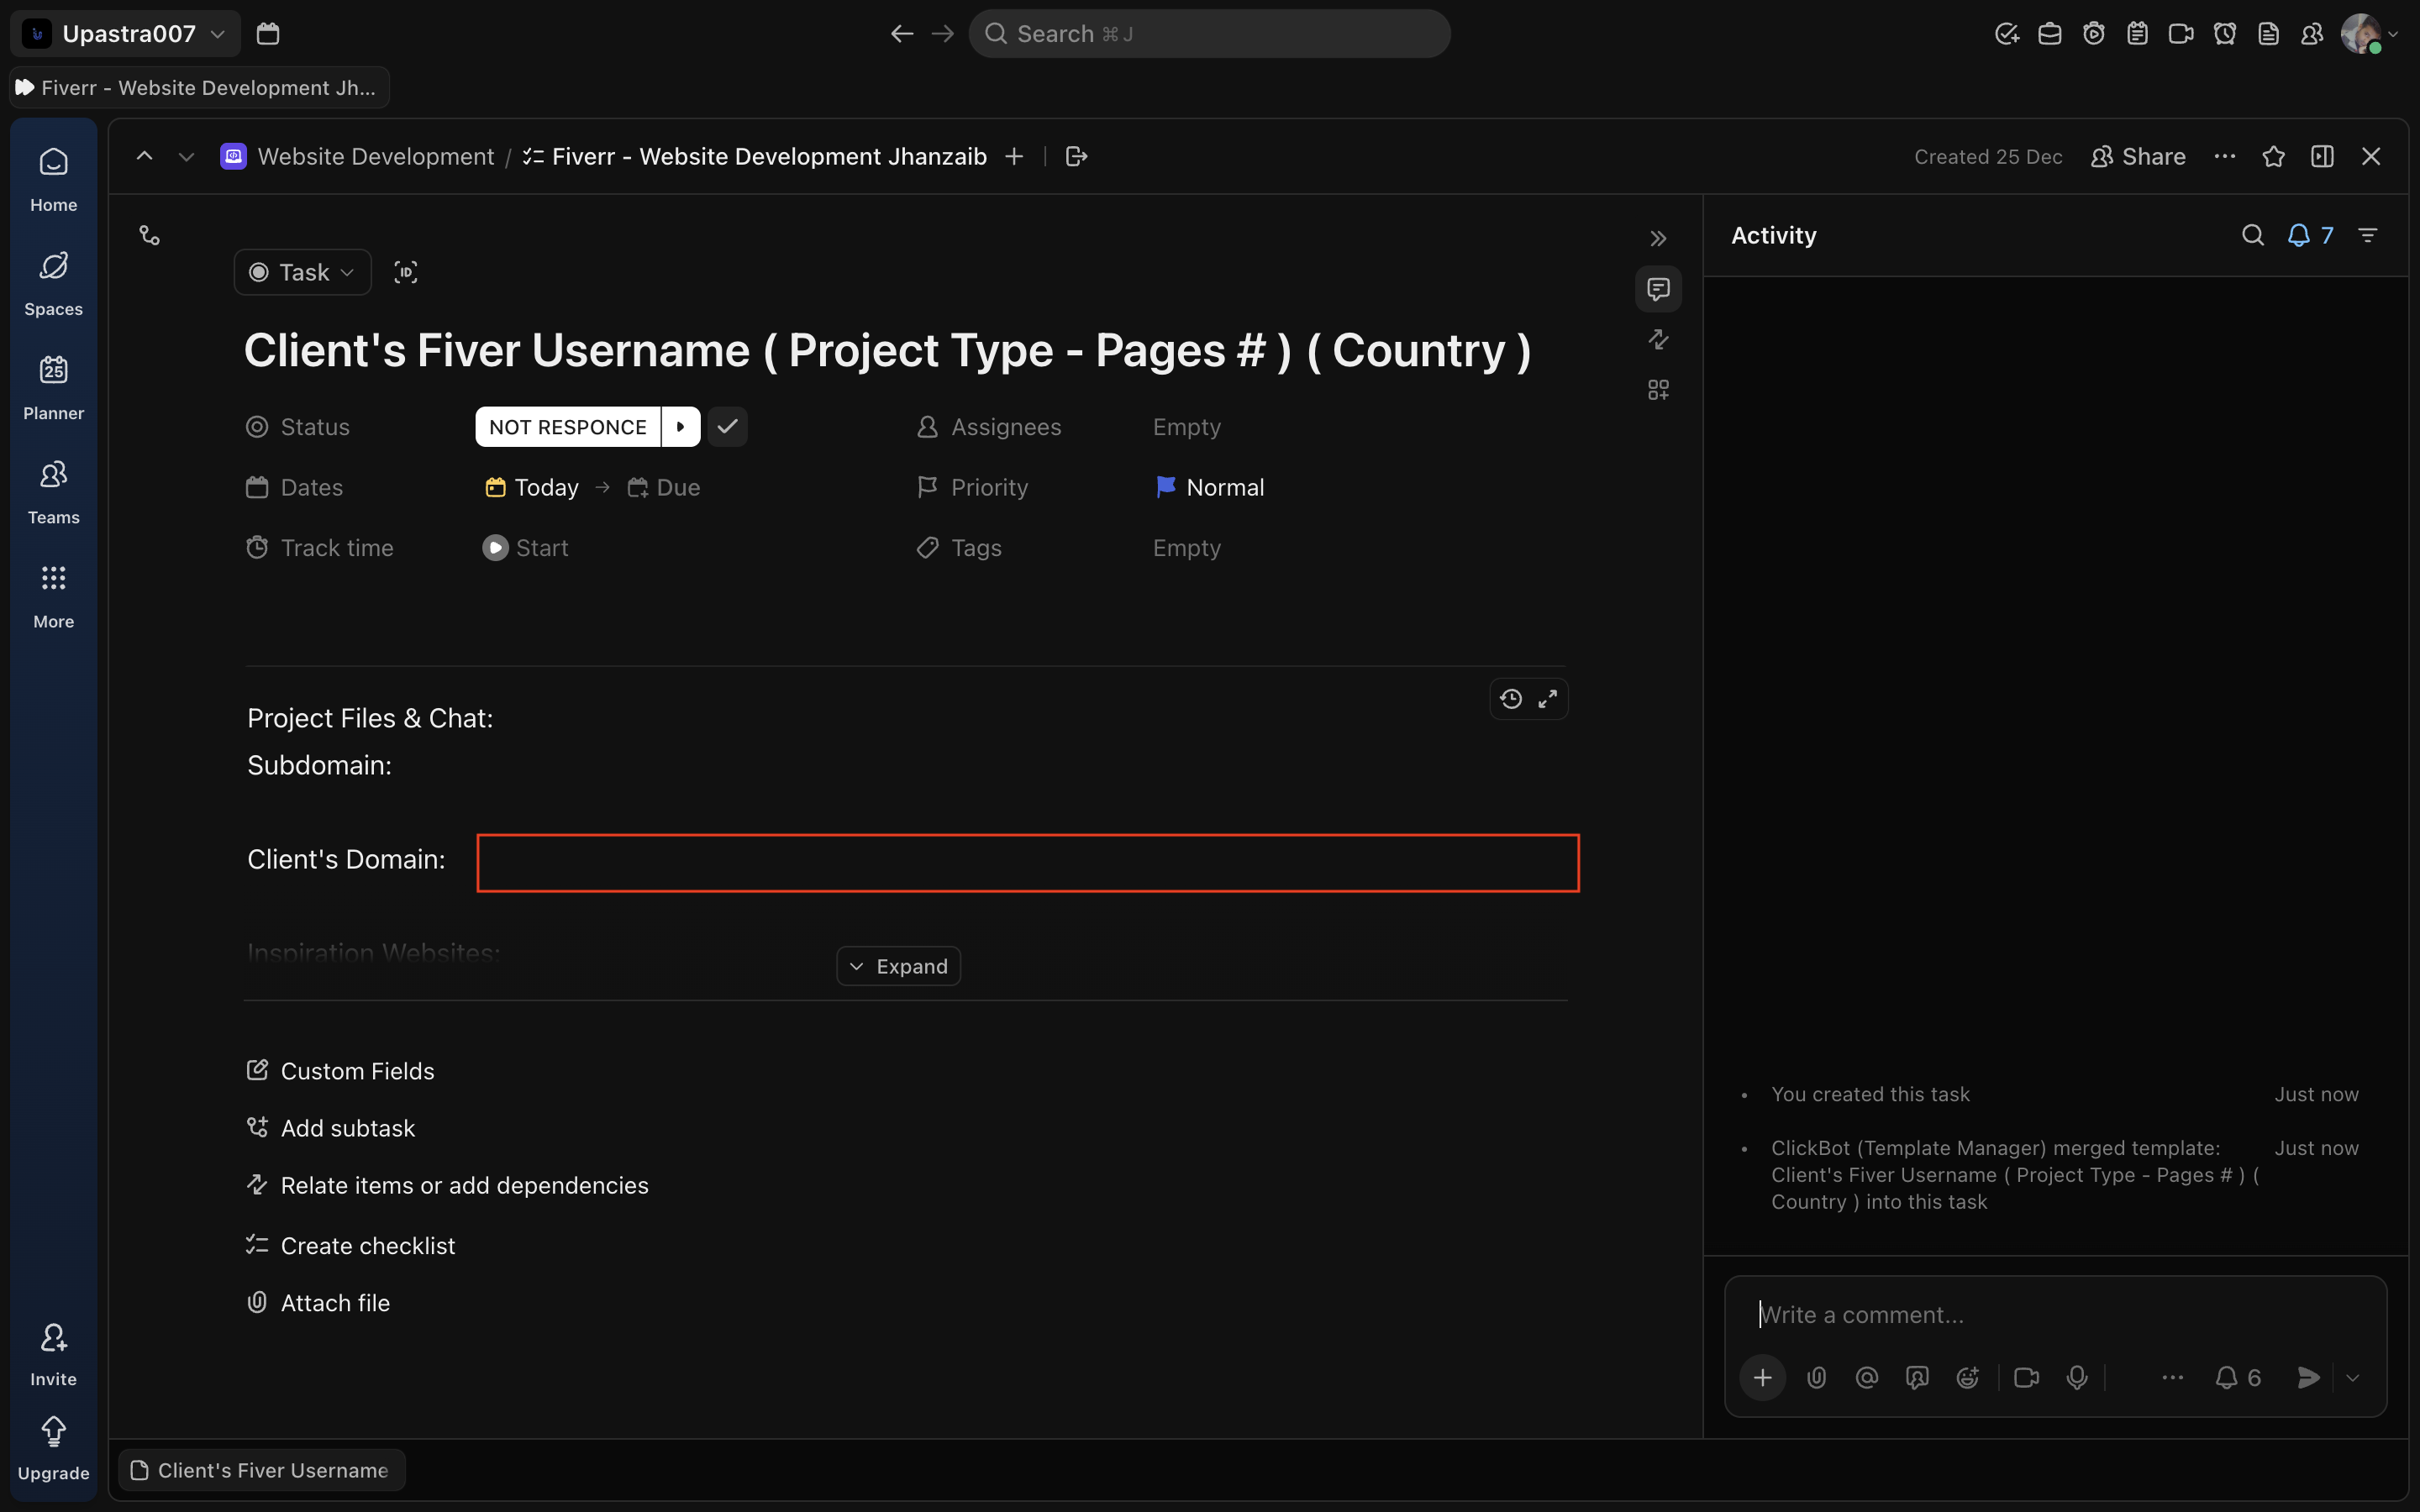
🔹 Step 7: Add Client’s Final Domain
Under Client’s Domain:
- Add the live domain on which we will transfer the website once the project scope is completed or client approves the transfer if client already has any active website on the domain.
Screenshot: Client domain field
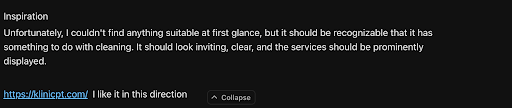
🔹 Step 8: Add Inspiration Websites & Notes
Under Inspiration Websites:
- Paste all reference links shared by the client
- Add short notes if required (layout, colors, structure)
Keep it short and clear.
Screenshot: Inspiration websites field
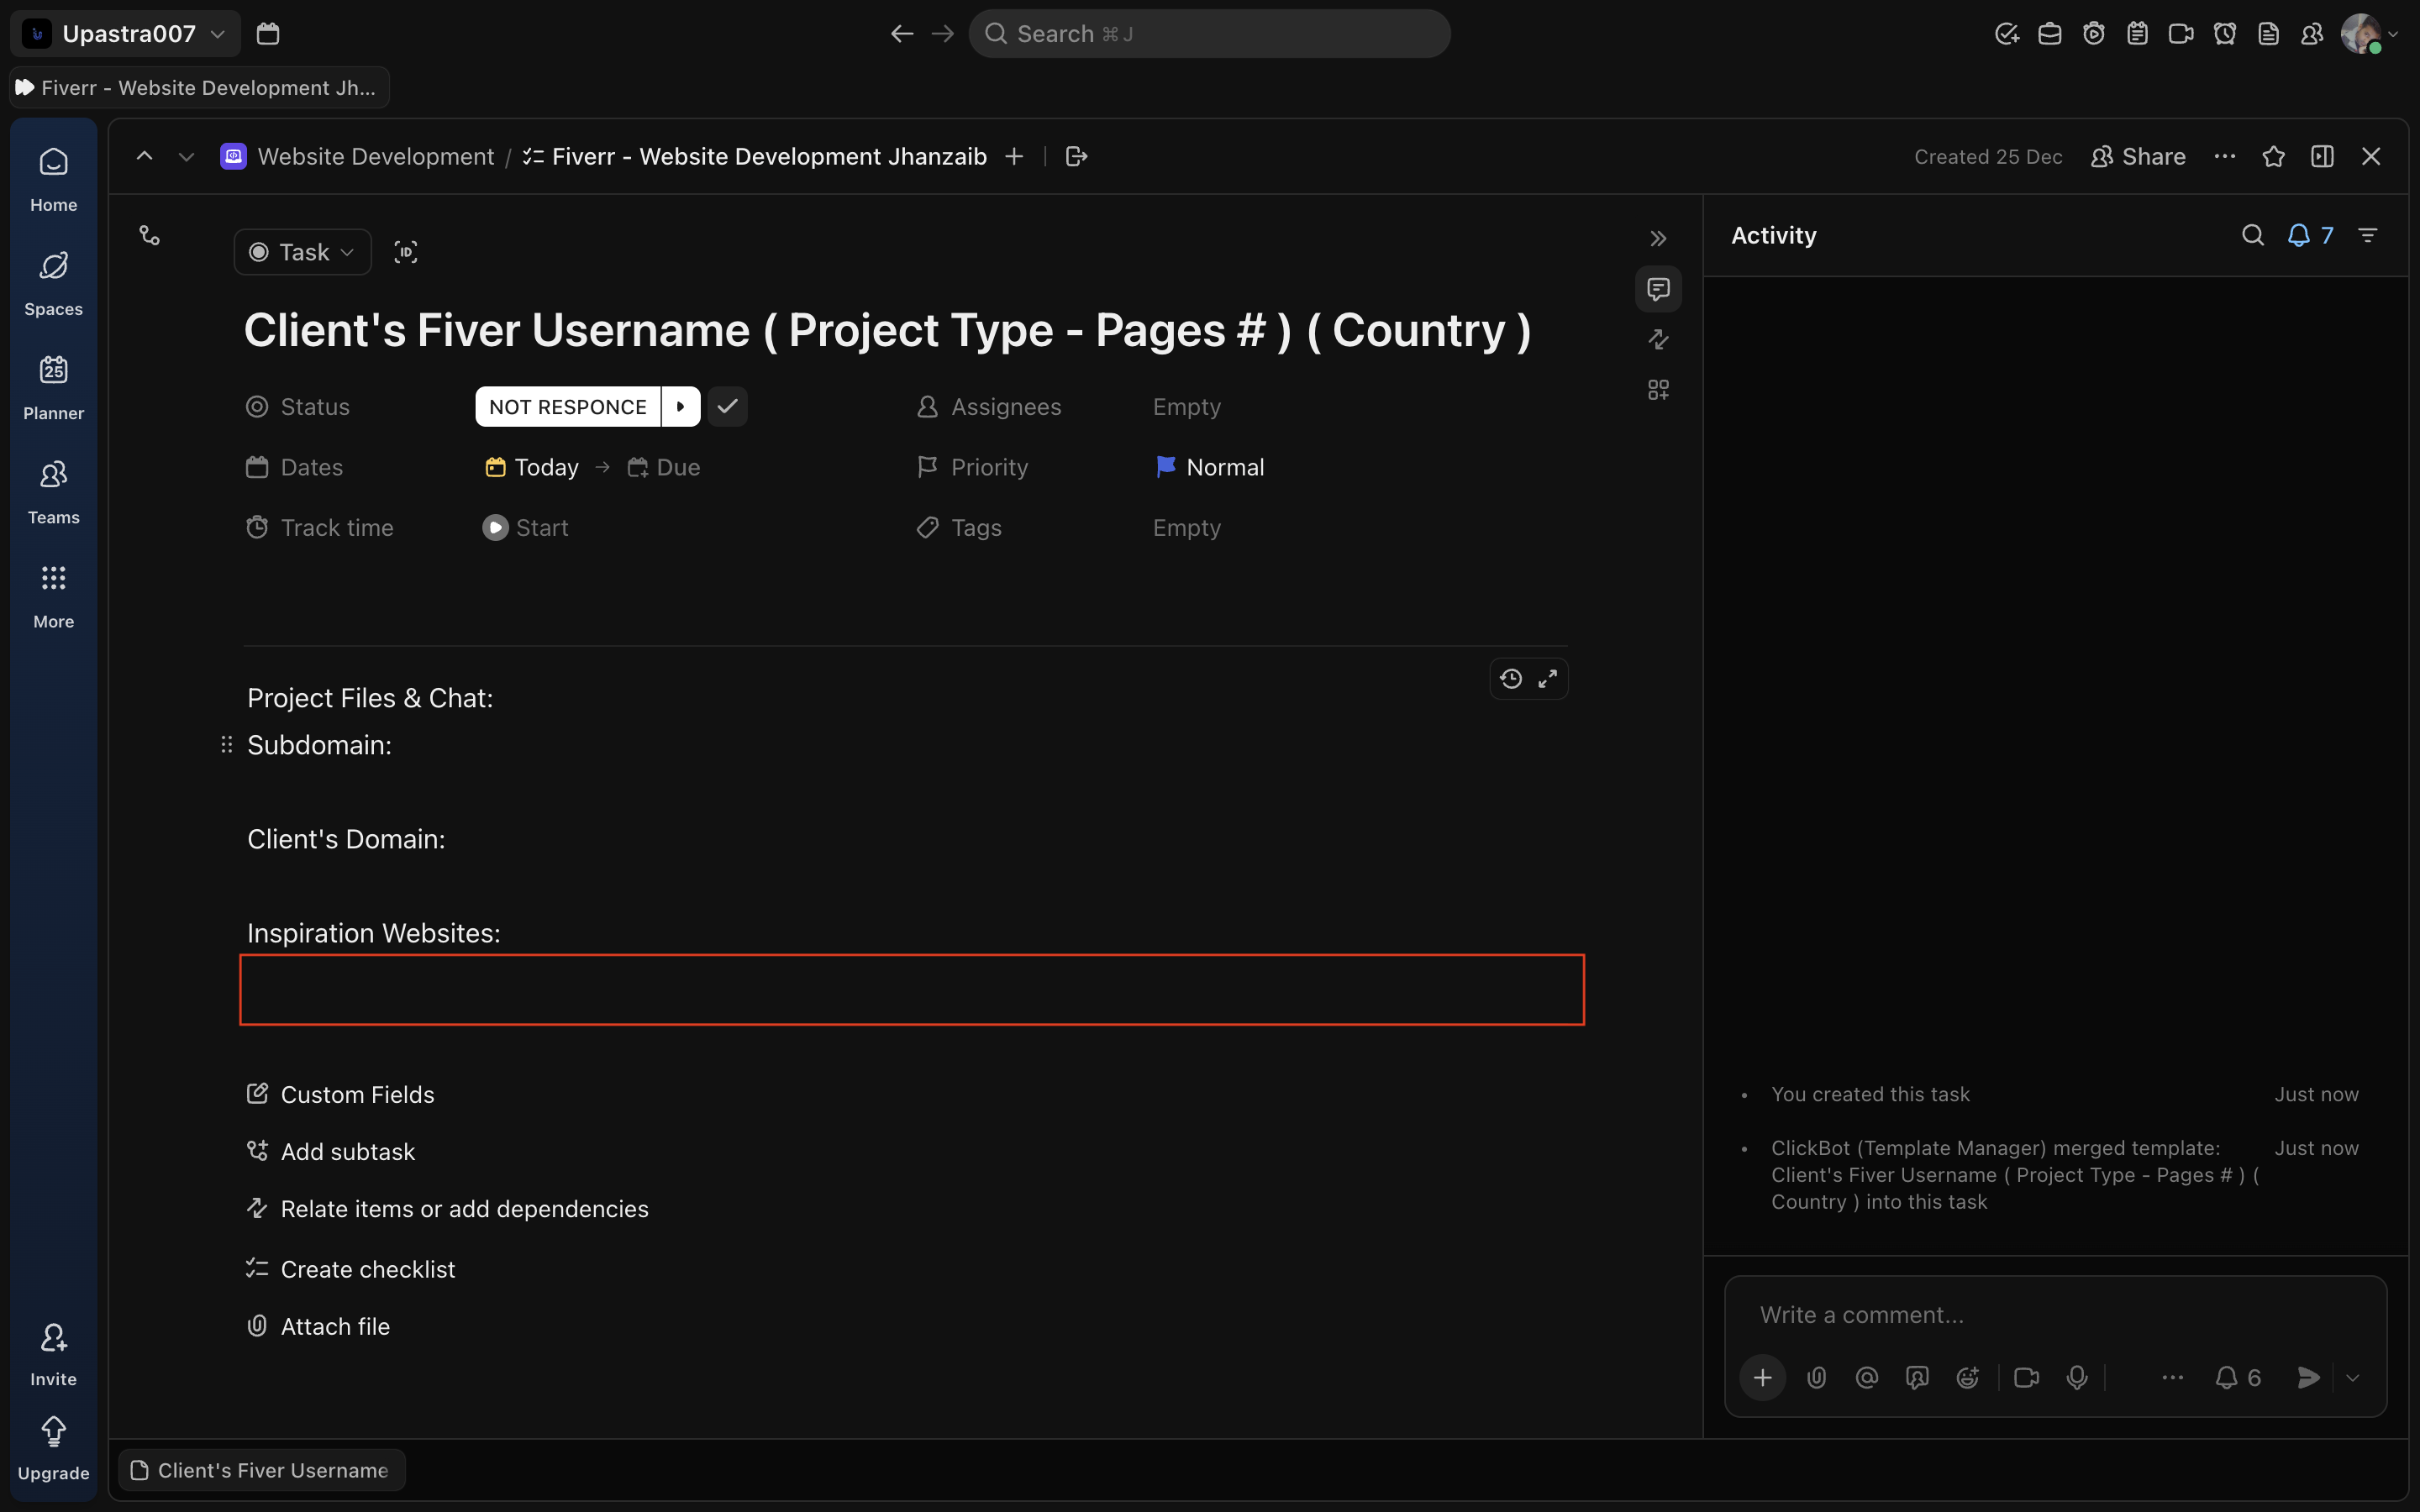
Like This as well: Any notes based on the inspiration given by the client.
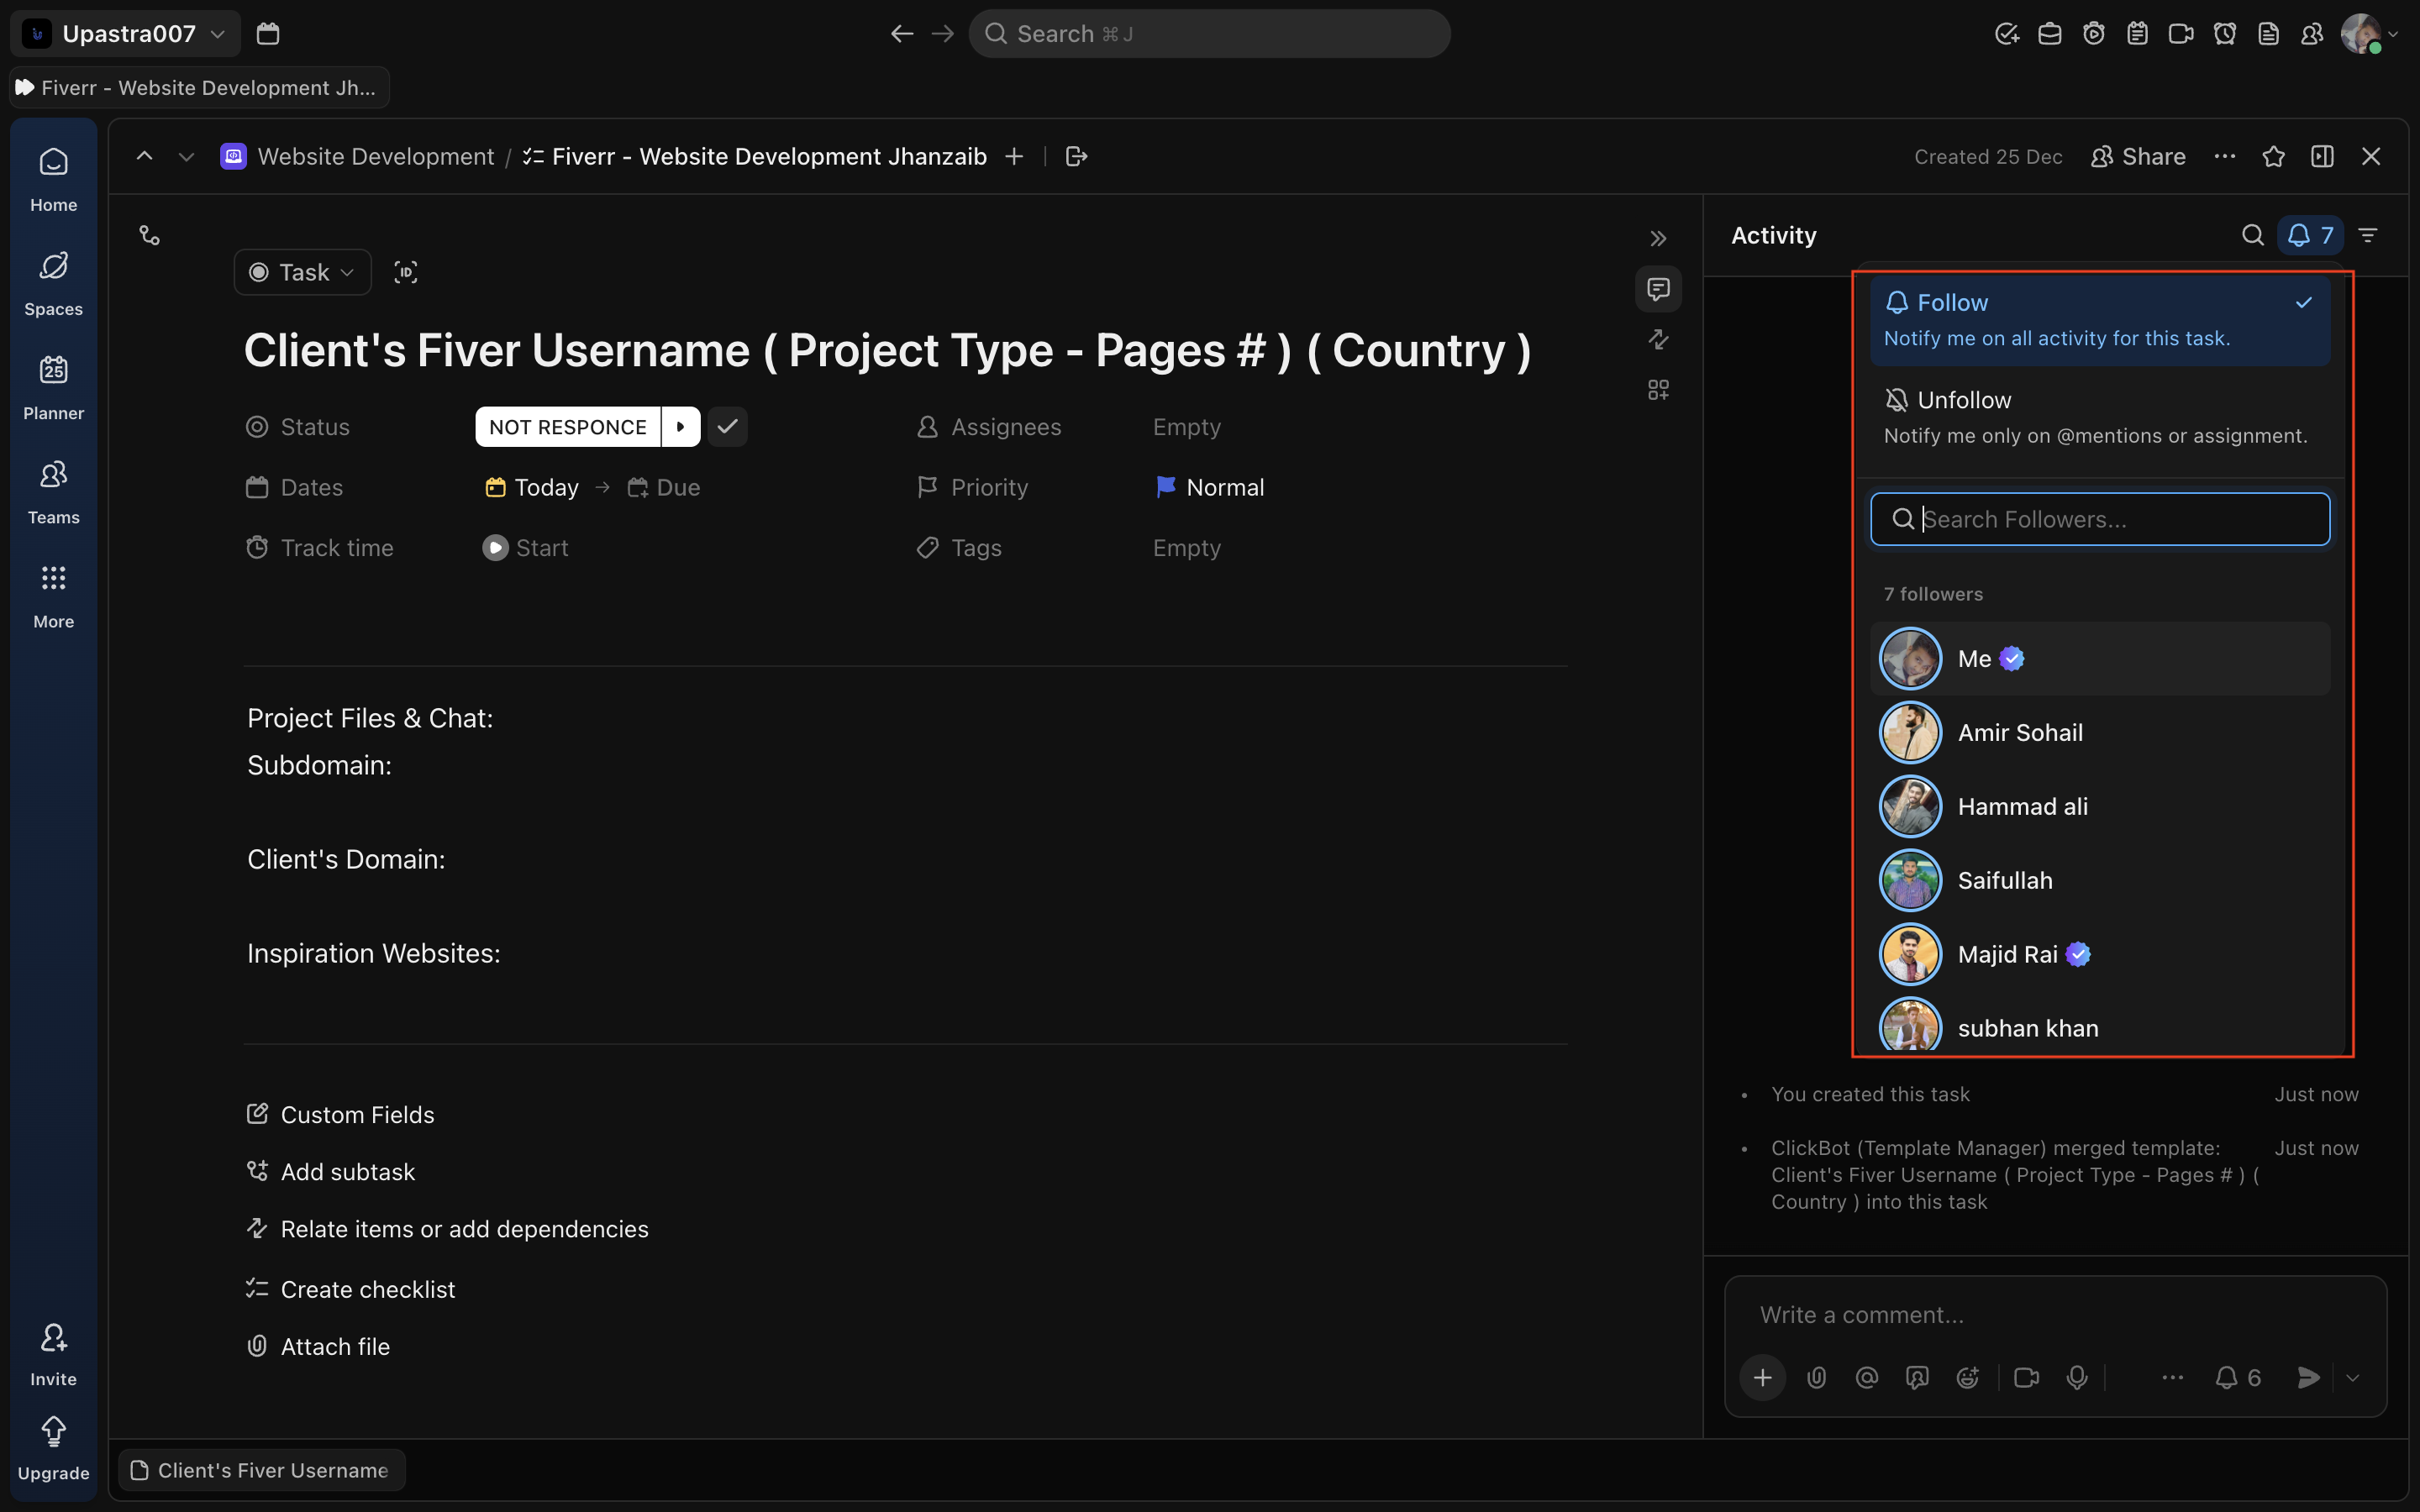
🔹 Step 9: Verify Watchers
- Open Followers / Watchers
- Confirm core team members are already added by template
- Do NOT remove watchers
Screenshot: Watchers panel : It has all of the Managers Admin And Project Completion, Closer Members.
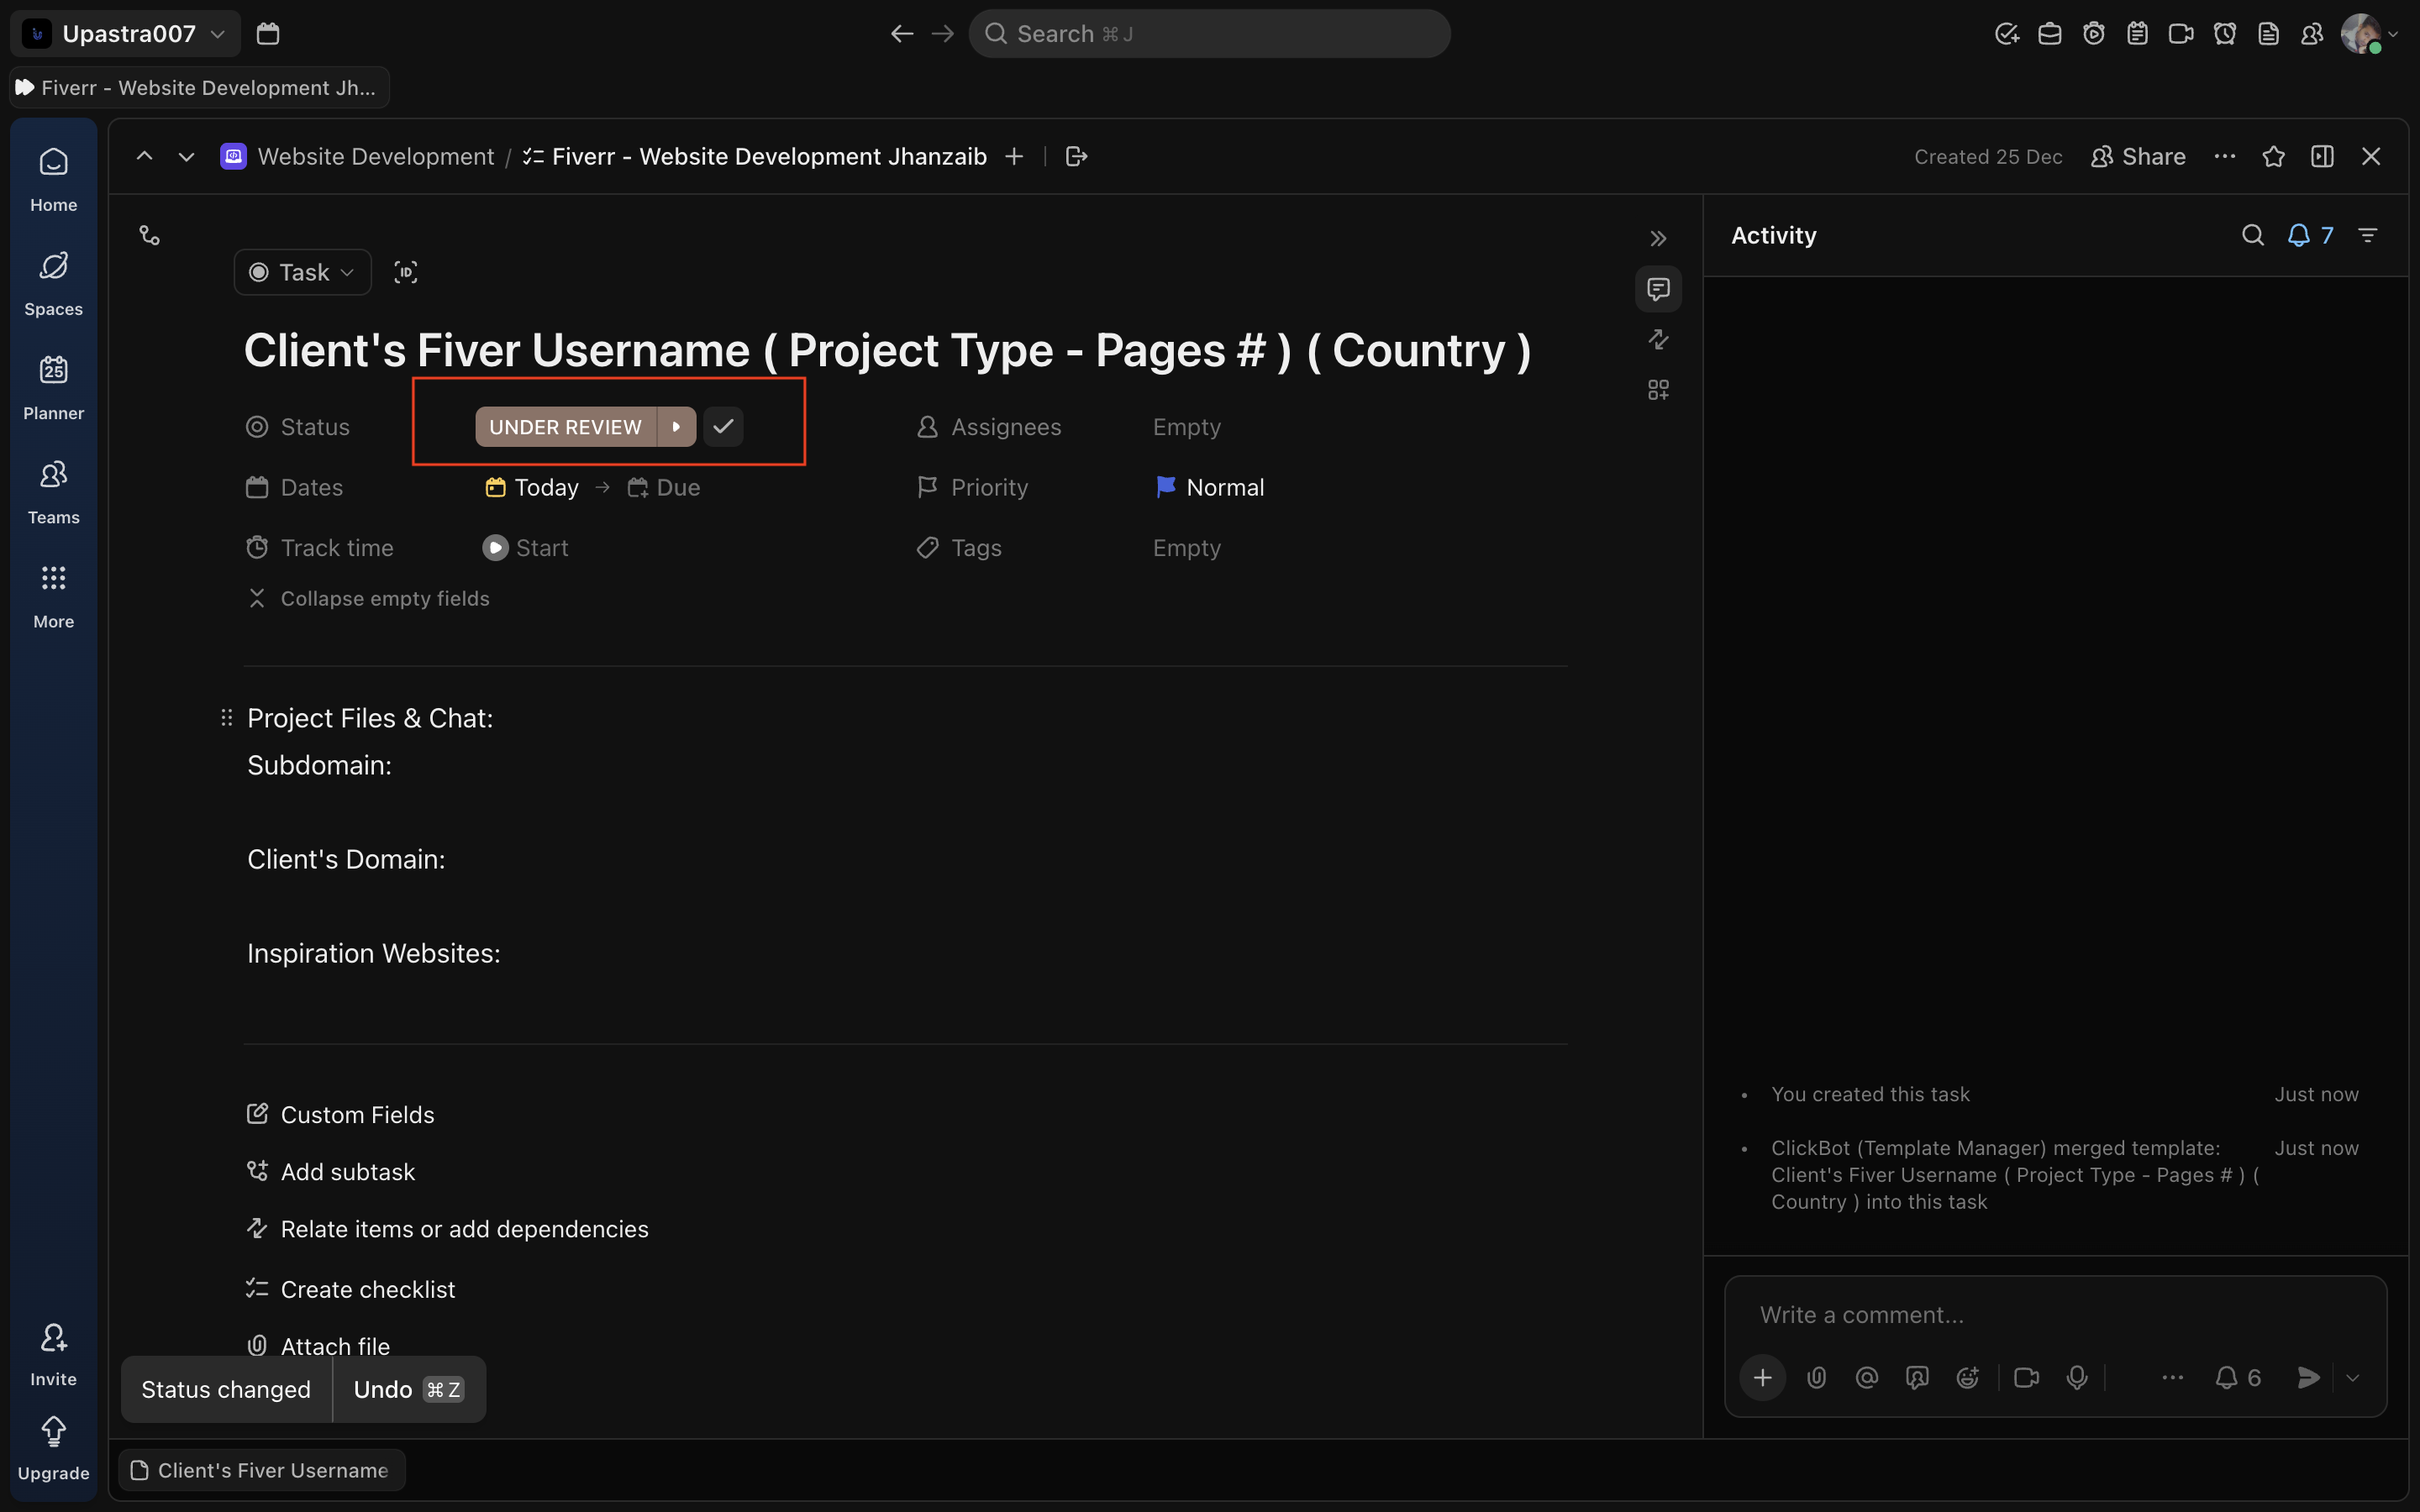
🔹 Step 10: Update Task Status
- Only after all above fields are filled
- Move task to the appropriate next status (e.g. Under Review )
Screenshot: Status changed to Under Review
🔍 Quality Check (Before Moving Status)
Before changing the task status from Not Response / Ready to Start:
Ensure ALL are filled:
- Correct task title
- Drive link added
- Subdomain (if created)
- Client domain (if available)
- Inspiration links (if shared)
🟡 Why it Matters
If any required field is missing, the task is considered INCOMPLETE — even if work has started.
This SOP exists to protect speed, clarity, and quality. Follow it strictly.
How to Upload Project Changes | Step-by-Step SOP for Smooth Updates
Purpose
This SOP explains the exact process to follow when a client sends new changes or revision requests. It ensures that all updates are correctly saved, organized, uploaded, and communicated in ClickUp for tracking and quality assurance.
Step-by-Step Procedure
Step 1: Identify the Client’s Changes
-
When the client sends new changes (via chat, document, or ClickUp comment), review them carefully.
-
Go to the client’s project in ClickUp or the assigned workspace.
-
Check under the “New Changes” or “Revisions” section to confirm the update request.
-
Make sure you clearly understand what the client wants before proceeding.
Step 2: Copy the Project Name
-
Copy the exact project name mentioned in ClickUp or the client message.
-
Use the search bar in ClickUp to find that specific project.
-
Open the correct task or folder where you’ll be uploading the new changes.
Step 3: Create a “Changes” Folder
-
Inside the main project folder (usually on Google Drive or internal storage),
create a new subfolder named according to the update version, for example:-
Changes 1
-
Changes 2
-
Changes 3, etc.
-
-
This helps keep each round of revisions organized and traceable.
Step 4: Save All Provided Data
-
Download or save all files, images, text, or videos that the client shared for the new changes.
-
Store them inside the newly created Changes folder.
-
Double-check that all files are saved correctly and not corrupted.
Step 5: Apply the Client’s Changes
-
Open the latest working draft of the project (for example, a website or design file).
-
Apply the changes exactly as instructed by the client.
-
Cross-check the result to ensure all points are covered.
-
Save your work once all updates are complete.
Step 6: Upload the Updated Version
-
Upload the revised version to the proper location (e.g., project drive or staging link).
-
Name the folder or link clearly, such as:
-
ClientName – Changes 2
-
Website Draft – Round 1 Updates
-
-
If applicable, take screenshots of the updated sections for reference.
Step 7: Update ClickUp
-
Go back to the ClickUp task related to this project.
-
Post a new comment mentioning:
-
“New changes have been uploaded.”
-
Include the updated folder link or staging link.
Example:
“Hi [Team/Client], the new changes have been uploaded in the Drive folder: [Insert Link]. Please review.”
-
-
Change the task status to ‘Uploaded Changes’ or ‘Ready for Review’.
Step 8: Verify and Notify
-
Double-check that everything is properly uploaded and visible in the Drive or platform.
-
Notify your senior or project manager that the changes have been uploaded.
-
If any step is unclear or an issue arises, contact your senior immediately for clarification.
Step 9: Maintain Version History
-
Keep a record of every version and date uploaded.
-
Example folder structure:
-
Changes 1 → Uploaded on 25 Oct 2025
-
Changes 2 → Uploaded on 1 Nov 2025
-
-
This helps track project progress and client revisions efficiently.
Final Note
Always follow this SOP for every change round.
If you’re unsure about any client instruction, do not upload incomplete or unclear work—consult your senior first.
Maintaining clarity and organized documentation avoids confusion in later revisions.
How to Properly Update Past Client Changes - Documentation Issue
Project Status: How to Update and Maintain
Fiverr Delivery Message SOP (Full-Proof)
🎯 CORE RULE (NON-NEGOTIABLE)
A delivery is COMPLETE when the agreed scope is finished and proof is shared. Revisions, transfers, logins, hosting, or silence from the client do not make a delivery incomplete.
Never imply incompletion in wording. Ever.
🚫 FORBIDDEN WORDS (AUTO-FLAG RISK)
Never use in delivery or follow-ups:
-
draft
-
preliminary
-
phase 1
-
not final
-
pending
-
once finalized
-
remaining work
-
waiting on client
✅ APPROVED WORDING
Always use:
-
completed as per the agreed scope
-
implemented
-
ready for review
-
revisions included
-
available for assistance
📦 DELIVERY SCENARIOS & EXACT MESSAGES
🟢 SCENARIO 1
Final Delivery (Client approved, no changes expected)
When to use
-
Client reviewed everything
-
Client said “you can deliver”
-
Site is final/live
Delivery Message
Hello,
I’m pleased to inform you that your order has been completed as per the agreed scope. Thank you for trusting me with your project.
Here is the website link :
Once you accept the final delivery, you’ll be prompted to leave a review. It will only take a moment, and I would truly appreciate your feedback.
If you have any questions or require any additional adjustments, please feel free to reach out through our Fiverr chat.
Best regards,
Jehan Zaib
🟡 SCENARIO 2
First Scope Delivery (Initial version, expecting revisions)
When to use
-
Scope is complete
-
First delivery
-
Feedback expected
Delivery Message
The website has been completed in accordance with the agreed scope and is now ready for your review.
Website / Preview Link:
[URL]
Please review the website and let me know if there are any revisions included in your package. You may place the order in revision and share the details, and I will take care of the updates.
If everything looks good, you may proceed with accepting the delivery. Once accepted, you’ll be prompted to leave a review. It will only take a moment, and It really helps us freelancers to grow on the platform.
I’m available if you need any assistance.
🔵 SCENARIO 3
Client has NO domain / NO hosting
When to use
-
Domain/hosting is client responsibility
-
Site built on your subdomain
Delivery Message
The website has been completed as per the agreed scope in the order and is ready for review.
Since the domain and hosting are not yet available, I’ve shared a preview link.
Preview link:
Please review the website and let me know if there are any revisions included in your order. You can submit them via the revision request, and I’ll take care of the updates.
Once you’re ready, you can also share the domain and hosting access, and I’ll transfer the website for you.
🟣 SCENARIO 4
Client has EXISTING website and doesn’t want overwrite yet
When to use
-
Live site exists
-
Preview/staging used
Delivery Message
The website has been completed as per the agreed scope of our order and is ready for review.
Since your domain currently has an active website, I’ve shared a preview link so you can review everything before going live.
Preview link:
Please review and share any revisions included in your order. Once you’re satisfied, I can proceed with replacing the existing website on your domain.
Please note: once approved, the new website will replace the existing website currently live on your domain.
🟤 SCENARIO 5
Transfer didn’t happen → Backup files provided
When to use
-
Transfer blocked
-
Client inactive
-
Backup delivery allowed
Delivery Message
Hi {username},
Just a quick update regarding your website.
The project was completed earlier and, as there hasn’t been any recent activity, the temporary preview has been archived. A full backup has been securely saved, so the website can be deployed or transferred anytime whenever you’re ready.
If you’d like to proceed or need any assistance, feel free to reach out — I’ll be happy to help.⚠️ Never include usernames/passwords.
⚪ SCENARIO 6
Auto-Completed Order (Client silent)
When to use
-
Fiverr auto-completed
-
Courtesy follow-up only
Message
Hello {username}...,
Just a quick note to let you know the order has been auto-completed by Fiverr.
If you’d like any revisions included in your order or need help with anything related to the website, feel free to reach out anytime.🟠 SCENARIO 7
Client returns after months
Message
No problem at all — I’ve already archived the website and have a full backup ready.
Once you’re ready, I can either transfer and deploy it for you or share the backup files so you can set it up yourself. Let me know how you’d like to proceed.
🔁 REVISIONS DELIVERY RULE
-
Deliver once when scope is complete
-
Handle revisions inside the order
-
Do NOT re-deliver unless files changed
-
Before final re-delivery, ask:
Please confirm if there are any further changes needed so I can proceed accordingly.
🔒 SECURITY RULES (MANDATORY)
Never:
Always:
🧠 ADDITIONAL SCENARIOS YOU MAY FACE (Handled by SOP)
✔ Third-party tools (Fillout, Calendly, GA, Stripe)
→ Feature delivered + temporary setup = complete delivery
✔ Large sites (files too big)
→ Preview + screenshots = valid proof
✔ Client delays content
→ Extend delivery, don’t deliver
✔ Client disappears forever
→ Archive + backup = protected
🏁 GOLDEN RULE (PIN THIS)
Deliver when scope is complete.
Proof matters more than perfection.
Language matters more than intention.
Final reassurance
This SOP:
-
Matches Fiverr support’s written guidance
-
Covers all real-world edge cases
-
Protects Top Rated status
-
Scales cleanly for teams
You can now operate without fear of wording-based warnings.
Just tell me what you want to lock next.
Revisions SOP
🎯 CORE RULE (NON-NEGOTIABLE)
Access collection is a client responsibility. The absence or delay of logins does NOT block delivery if the agreed scope is completed.
Never delay delivery due to missing logins if the scope is otherwise complete.
🔒 SECURITY FIRST (MANDATORY)
-
Never request passwords outside Fiverr chat
-
Never store client credentials in plain text documents
-
Never include credentials in delivery messages
-
Access is requested only when required
📥 REQUIRED LOGINS (STANDARD)
-
Domain registrar (GoDaddy, Namecheap, etc.)
-
Hosting provider (cPanel / Hosting dashboard)
-
WordPress admin (if existing site)
🟢 SCENARIO 1
Requesting Logins After Order Starts
When to use
-
Order has started
-
Client has domain/hosting
Message
To proceed smoothly, please share the following access details when convenient:
• Domain registrar login
• Hosting login
• WordPress admin login (if available)
You can share these securely here on Fiverr chat.
🟡 SCENARIO 2
Client Has NOT Shared Logins Yet
Message
Just a quick follow-up to check if you’ve had a chance to share the domain and hosting access.
No rush at all — once available, I’ll take care of the setup accordingly.
🔵 SCENARIO 3
Client Is Unsure How to Share Logins
Message
No worries at all.
If it helps, you can create a temporary admin user or share the hosting login directly. Either option works, and I’ll handle the rest.
🟣 SCENARIO 4
Client Does Not Have Hosting Yet
Message
That’s completely fine.
I’ve completed the website on a temporary setup for now. Once you purchase hosting and domain, you can share the access and I’ll transfer everything for you.
⏱️ FOLLOW-UP INTERVALS (STRICT)
-
Day 2 → Gentle reminder
-
Day 5 → Final reminder
-
No daily chasing
🟤 SCENARIO 5
Final Login Follow-Up
Message
Just a final check-in regarding the access details.
Whenever you’re ready, feel free to share them and I’ll proceed accordingly.
⚪ SCENARIO 6
Client Requests a Hosting / Setup Meeting
Message
Happy to help.
If you’d like, we can go over the hosting setup together on a quick call. Let me know a suitable time and I’ll arrange it.
⚫ SCENARIO 7
Logins Shared After Delivery
Message
Thanks for sharing the access.
I’ll take care of the setup and update you once everything is in place.
🚫 WHAT NOT TO DO
-
Do not block delivery due to missing logins
-
Do not repeatedly chase the client
-
Do not accept responsibility for delayed access
🏁 GOLDEN RULE (PIN THIS)
Logins enable work — they do not define delivery.
Scope completion comes first. Access follows.
Final reassurance
-
Protects delivery status
-
Prevents access-related disputes
-
Keeps responsibility correctly assigned
-
Scales cleanly for teams
Best Practices and Key Points for Website Transfer and Project Completion
Always update project status and tags immediately after website transfer to keep project tracking accurate.
Verify the transferred website in incognito mode immediately to avoid cache and display issues.
Communicate clearly and warmly with clients, confirming if everything is good to go and if any final changes are needed.
Encourage clients politely to provide positive feedback and 5-star reviews by highlighting the good working experience.
Understand that clear communication plays a crucial role alongside quality work in improving client satisfaction and reviews.
Implement these steps consistently to ensure smooth project completion, avoid confusion, and foster strong client relationships.
SOP – Proper Project Completion & Client Handover
🎯 Objective
Ensure every project is fully completed, verified, communicated, and closed in a professional and consistent manner that:
- Avoids confusion
- Prevents missed steps
- Maximizes client satisfaction
- Increases chances of 5-star reviews and referrals
🧱 Scope
Applies to:
- All website development projects
- Fiverr and off-platform clients
- New builds, redesigns, and website transfers
⚠️ Core Rules (Non-Negotiable)
- ❌ Never assume a project is complete without verification
- ❌ Never disappear after website transfer
- ❌ Never rush the client for feedback
- ✅ Completion = Technical + Communication + Client Confirmation
🧭 Step-by-Step Project Completion Process
🔹 Step 1: Final Website Transfer (If Applicable)
- Transfer the website to the client’s live domain
- Ensure:
- Correct domain is live
- No subdomain URLs remain
- SSL is active and working
📌 Do not proceed until transfer is successful.
👉 Follow SOP: How to Transfer a Website
🔹 Step 2: Verify Website in Incognito Mode (Mandatory)
Immediately after transfer:
- Open the website in Incognito / Private mode
- Check:
- Homepage loads correctly
- All pages open
- Forms work properly
- Images load
- Layout looks correct
🚫 Do NOT rely on logged-in or cached views.
👉 Follow SOP: How to Check a Website After Transfer
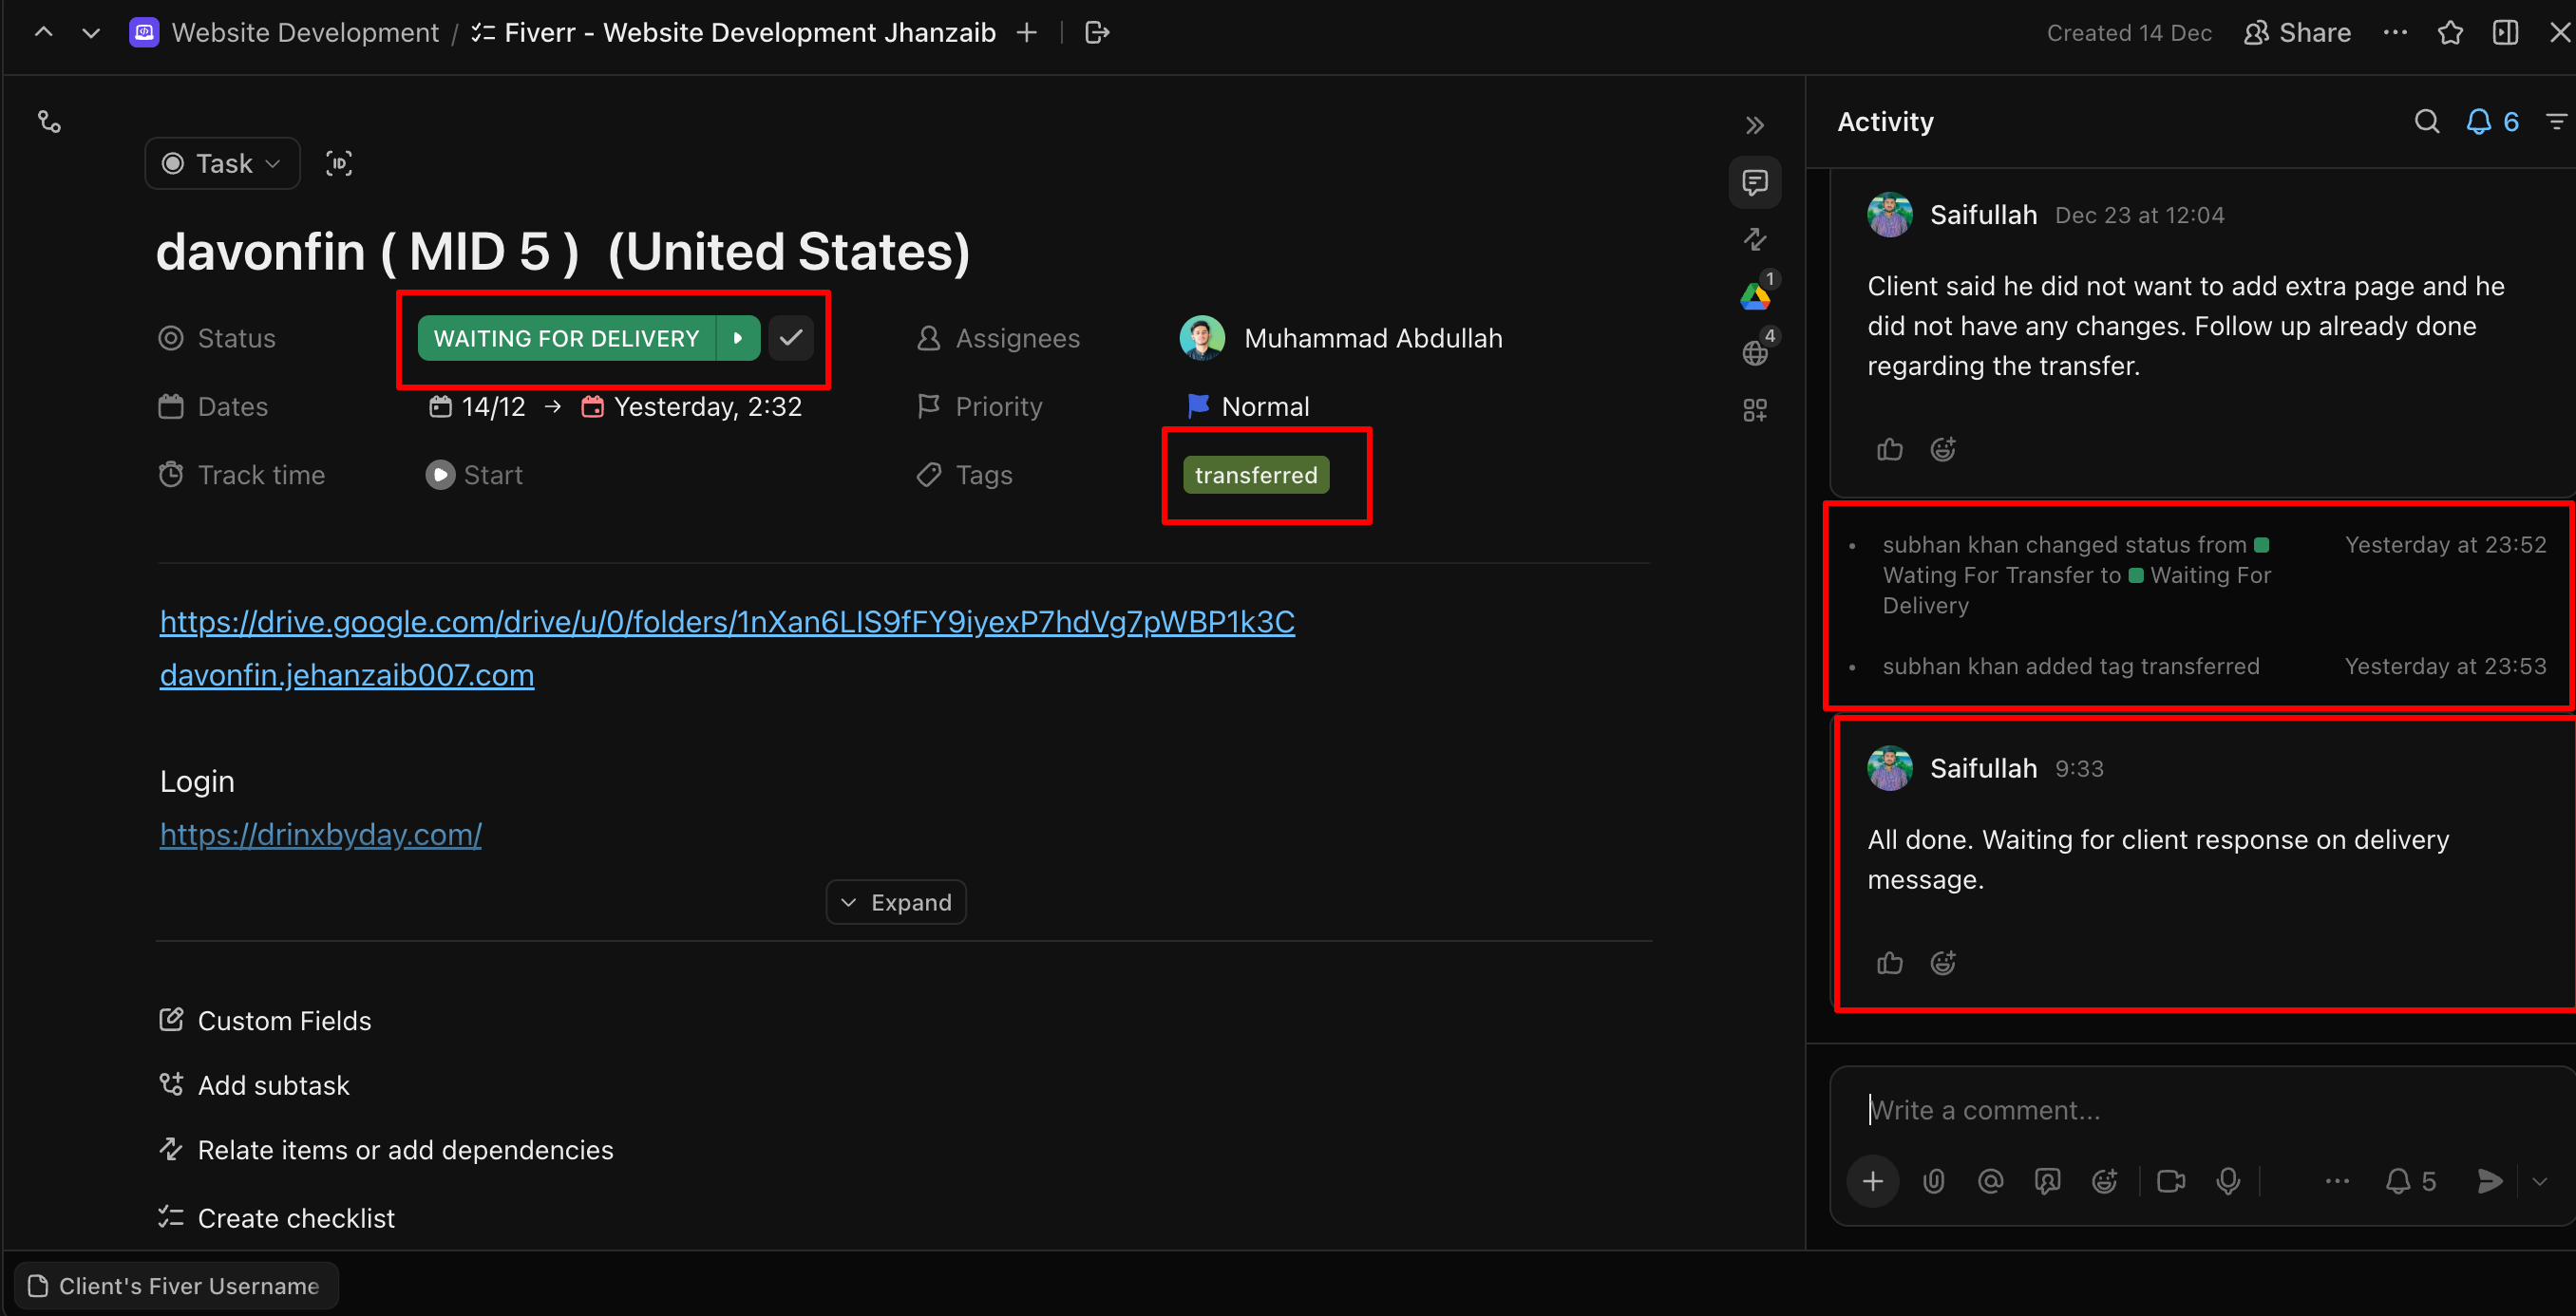
🔹 Step 3: Update Project Status & Tags
In ClickUp / CRM:
- Update project status:
Waiting for Transfer → Waiting for Delivery - Apply tag: Transferred
- Add activity note: Website transferred.
📌 Delayed updates = tracking failure.
🔹 Step 4: Internal Confirmation (Team Alignment)
Before contacting the client, confirm internally:
- No pending tasks
- No missing assets
- No unresolved client requests
Only proceed after internal confirmation.
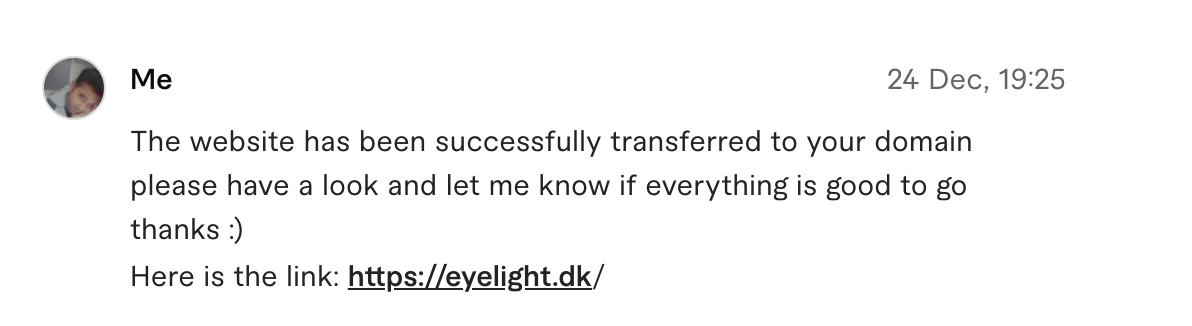
🔹 Step 5: Client Confirmation Message (Mandatory)
Send the saved Fiverr quick message:
Quick Message Name:
✅ Website Transfer Complete
Message:
The website has been successfully transferred to your domain.
Please have a look and let me know if everything is good to go.
Here is the link: {CLIENT URL}Tone must be clear, calm, and professional.
🔹 Step 6: Handle Final Changes (If Any)
- If the client requests changes:
- Follow the Changes SOP
- Do NOT mix delivery and revision steps
- Track all changes properly
- If no changes are requested → proceed.
🔹 Step 7: Encourage Feedback & Review (Polite & Natural)
Once the client confirms satisfaction:
- Deliver the order
- Follow the closing step
- Politely encourage feedback
- Do NOT pressure the client
(Use the approved delivery + review request message)
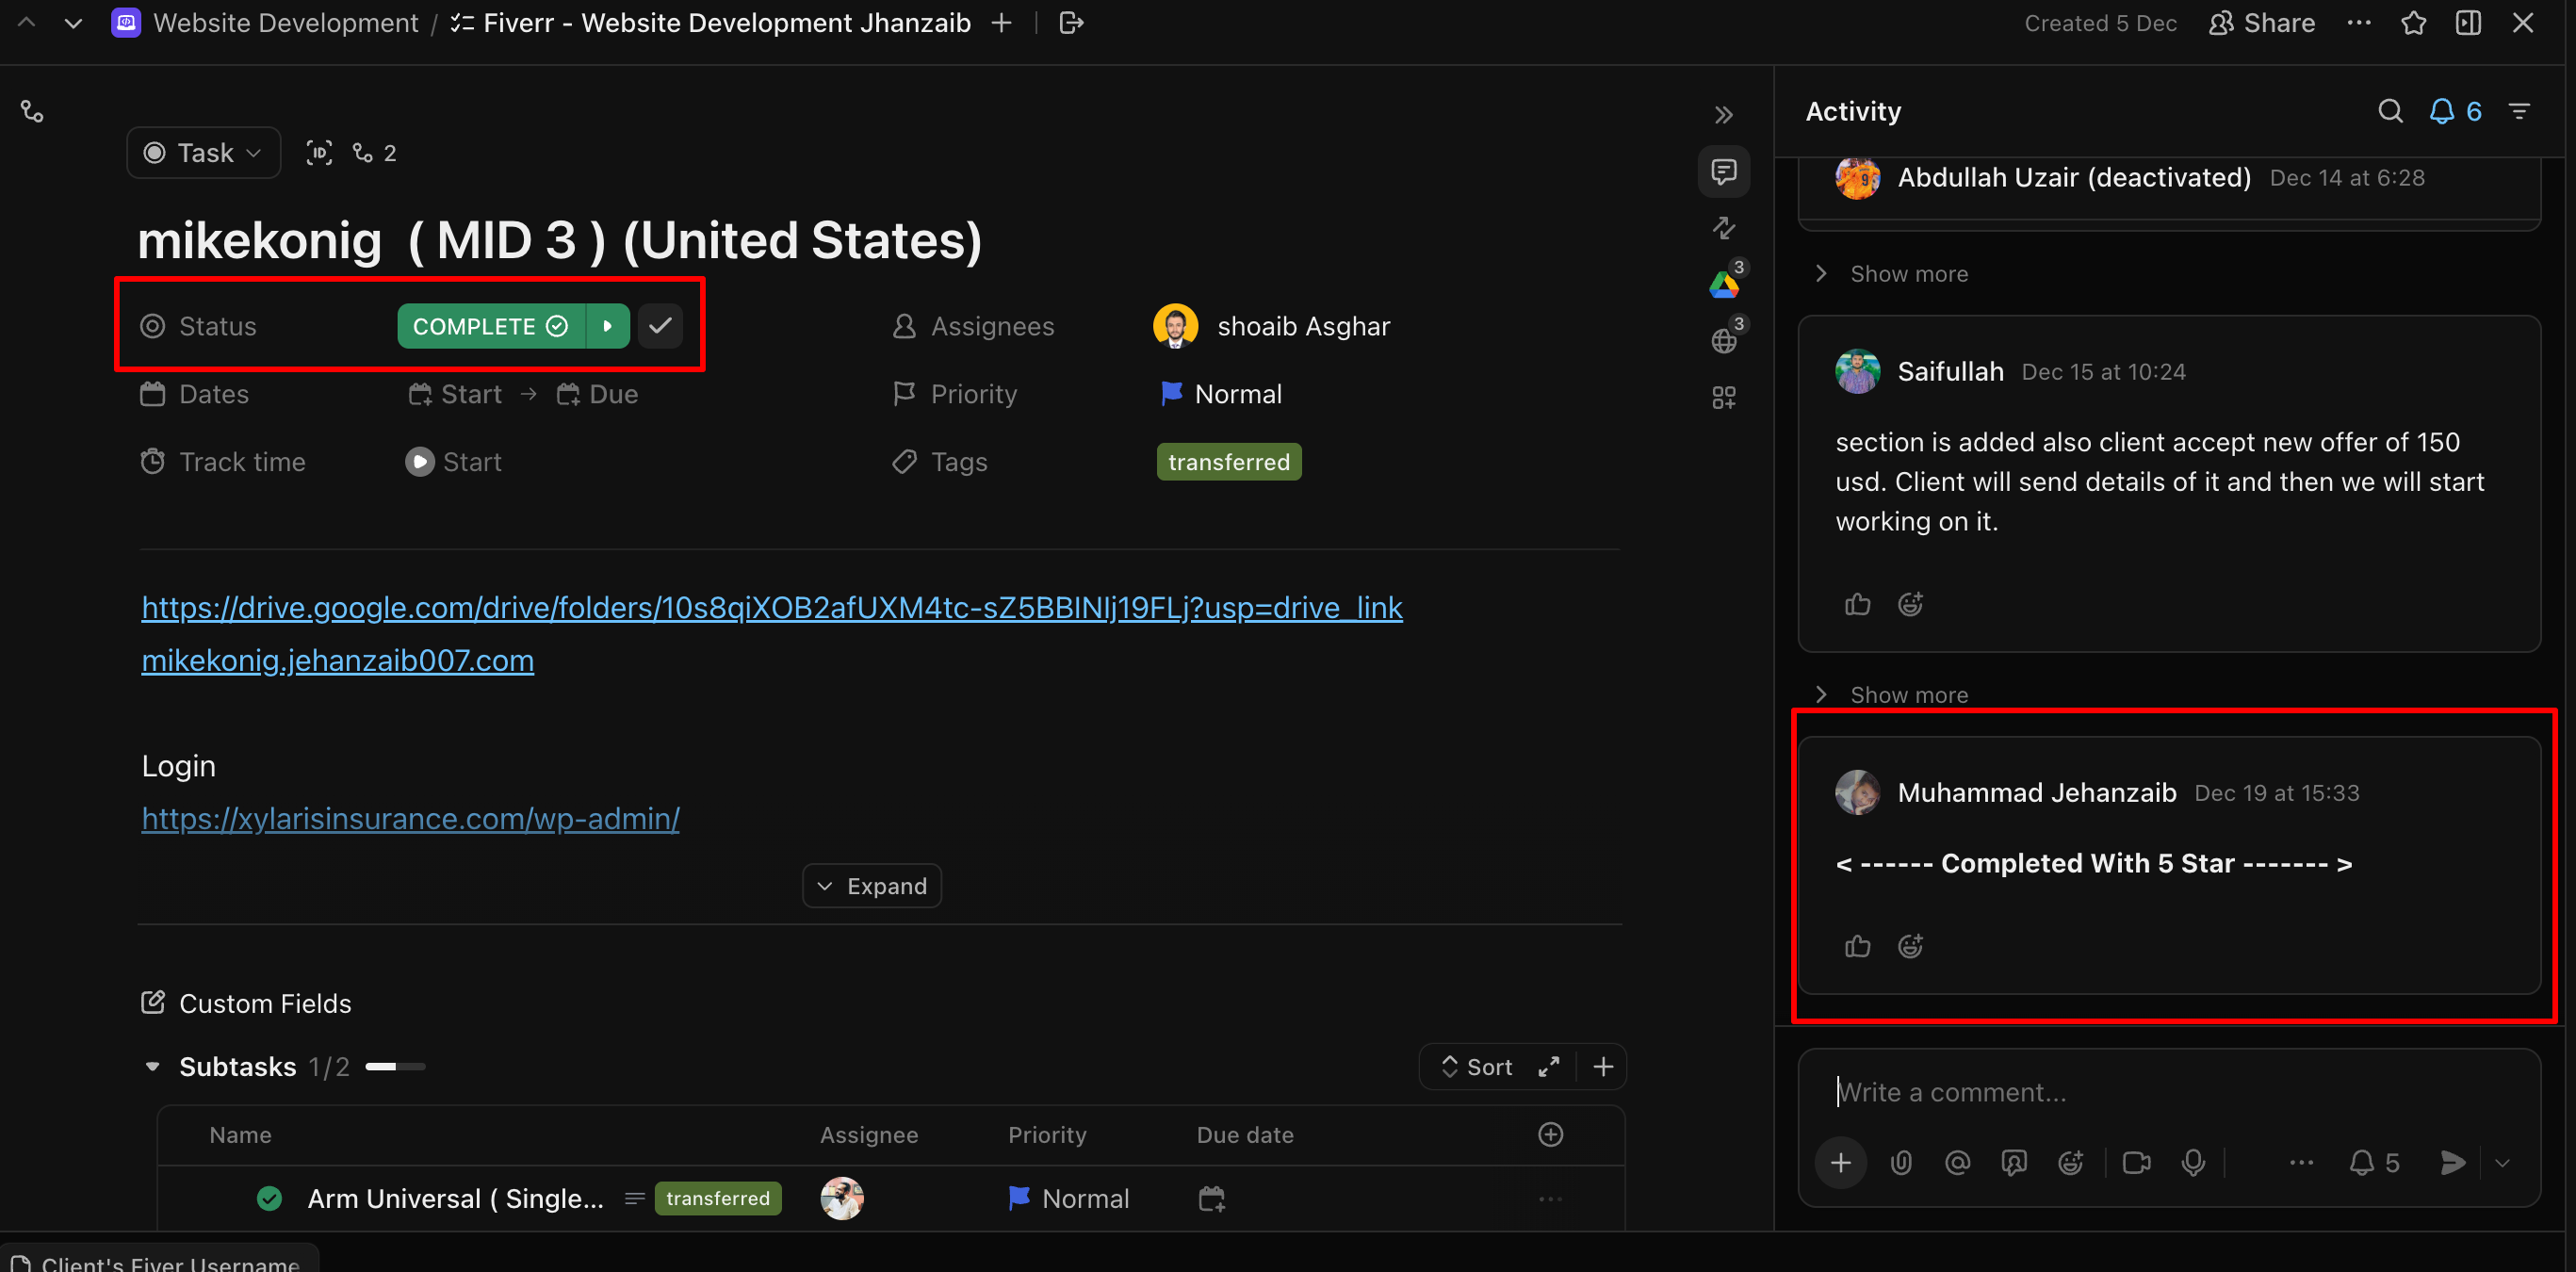
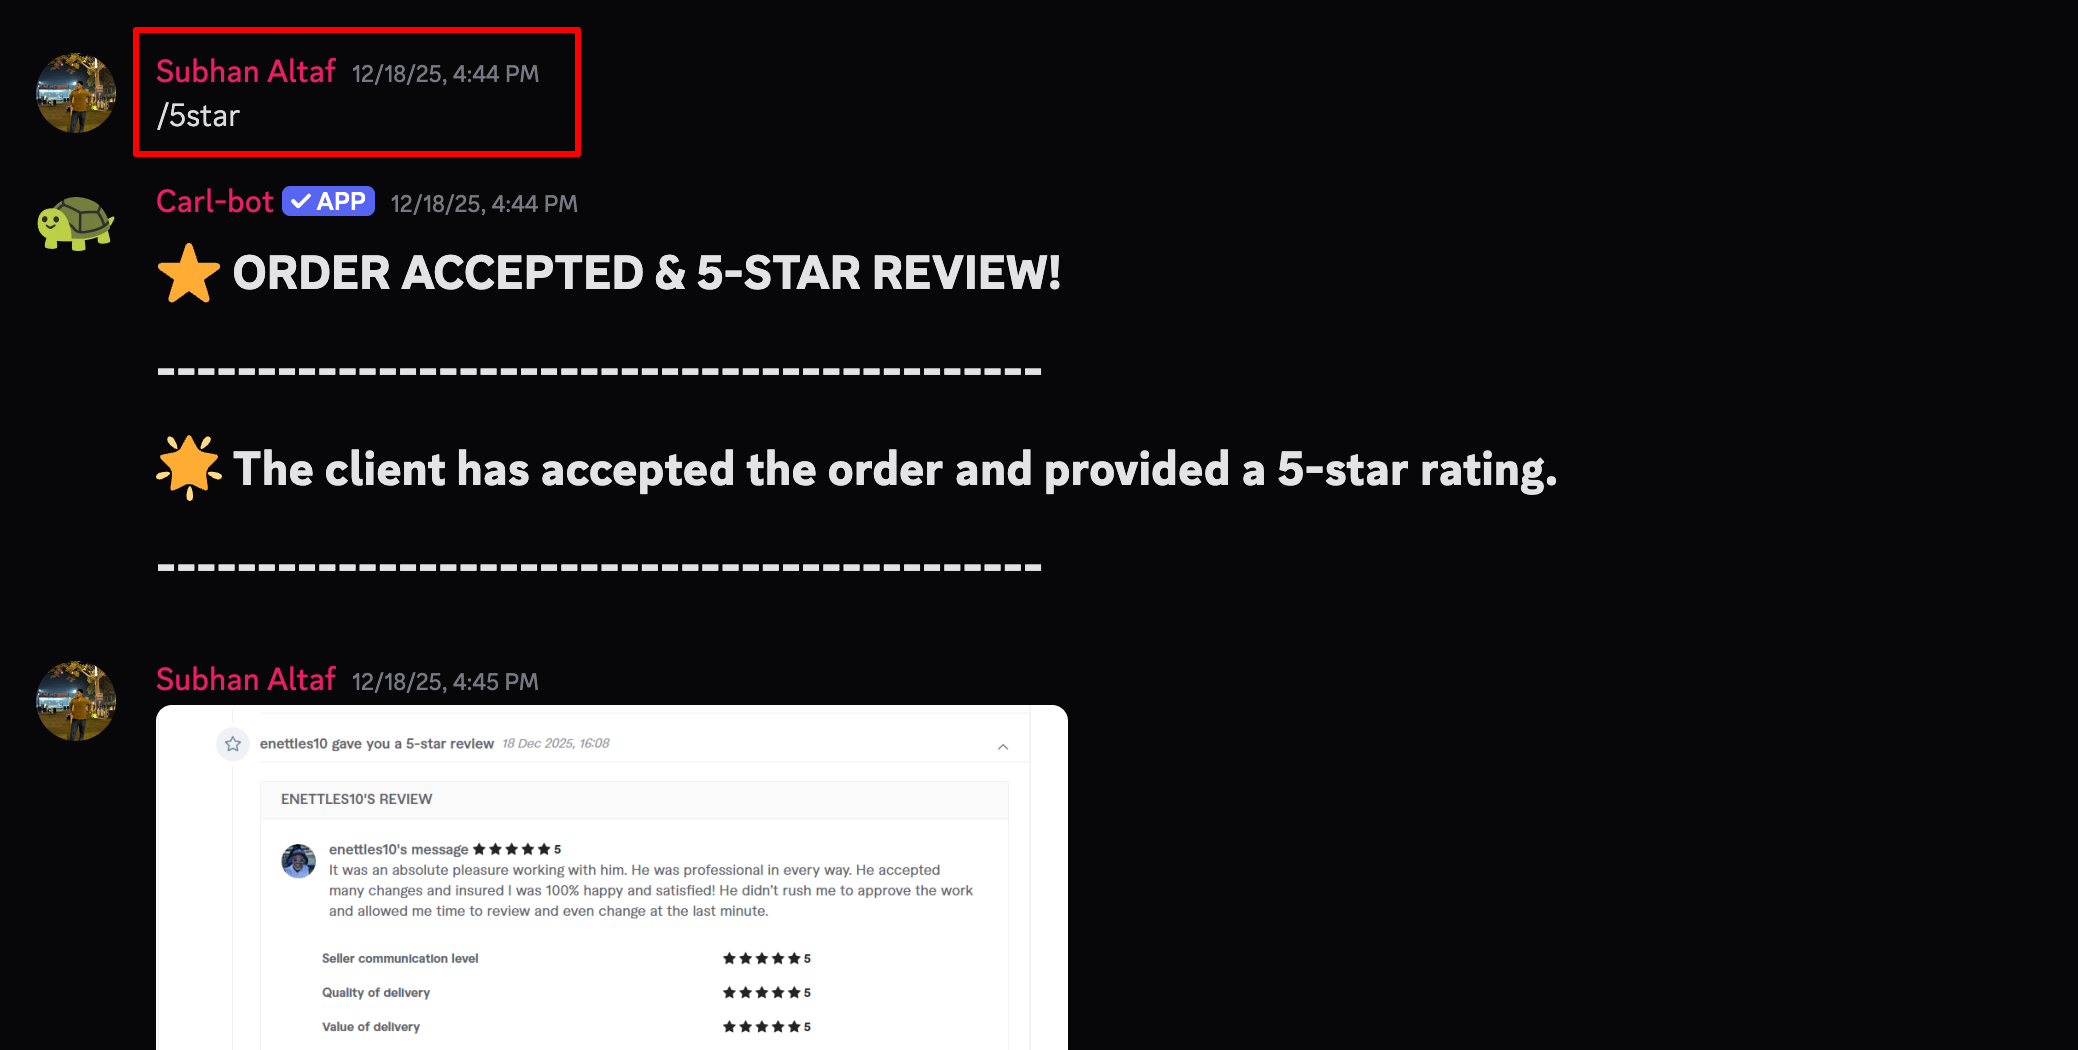
🔹 Step 8: Close the Project Properly
✅ Case 1: Client Leaves a Review
- Update ClickUp status:
- Delivered → Completed
- Add activity note: <—— Completed With 5 Star ——>

On Discord: - Use command: /5star (or relevant rating command: /4.7, /4.3, etc.)
- Also add the screenshot of the review as well for future refrecnes.

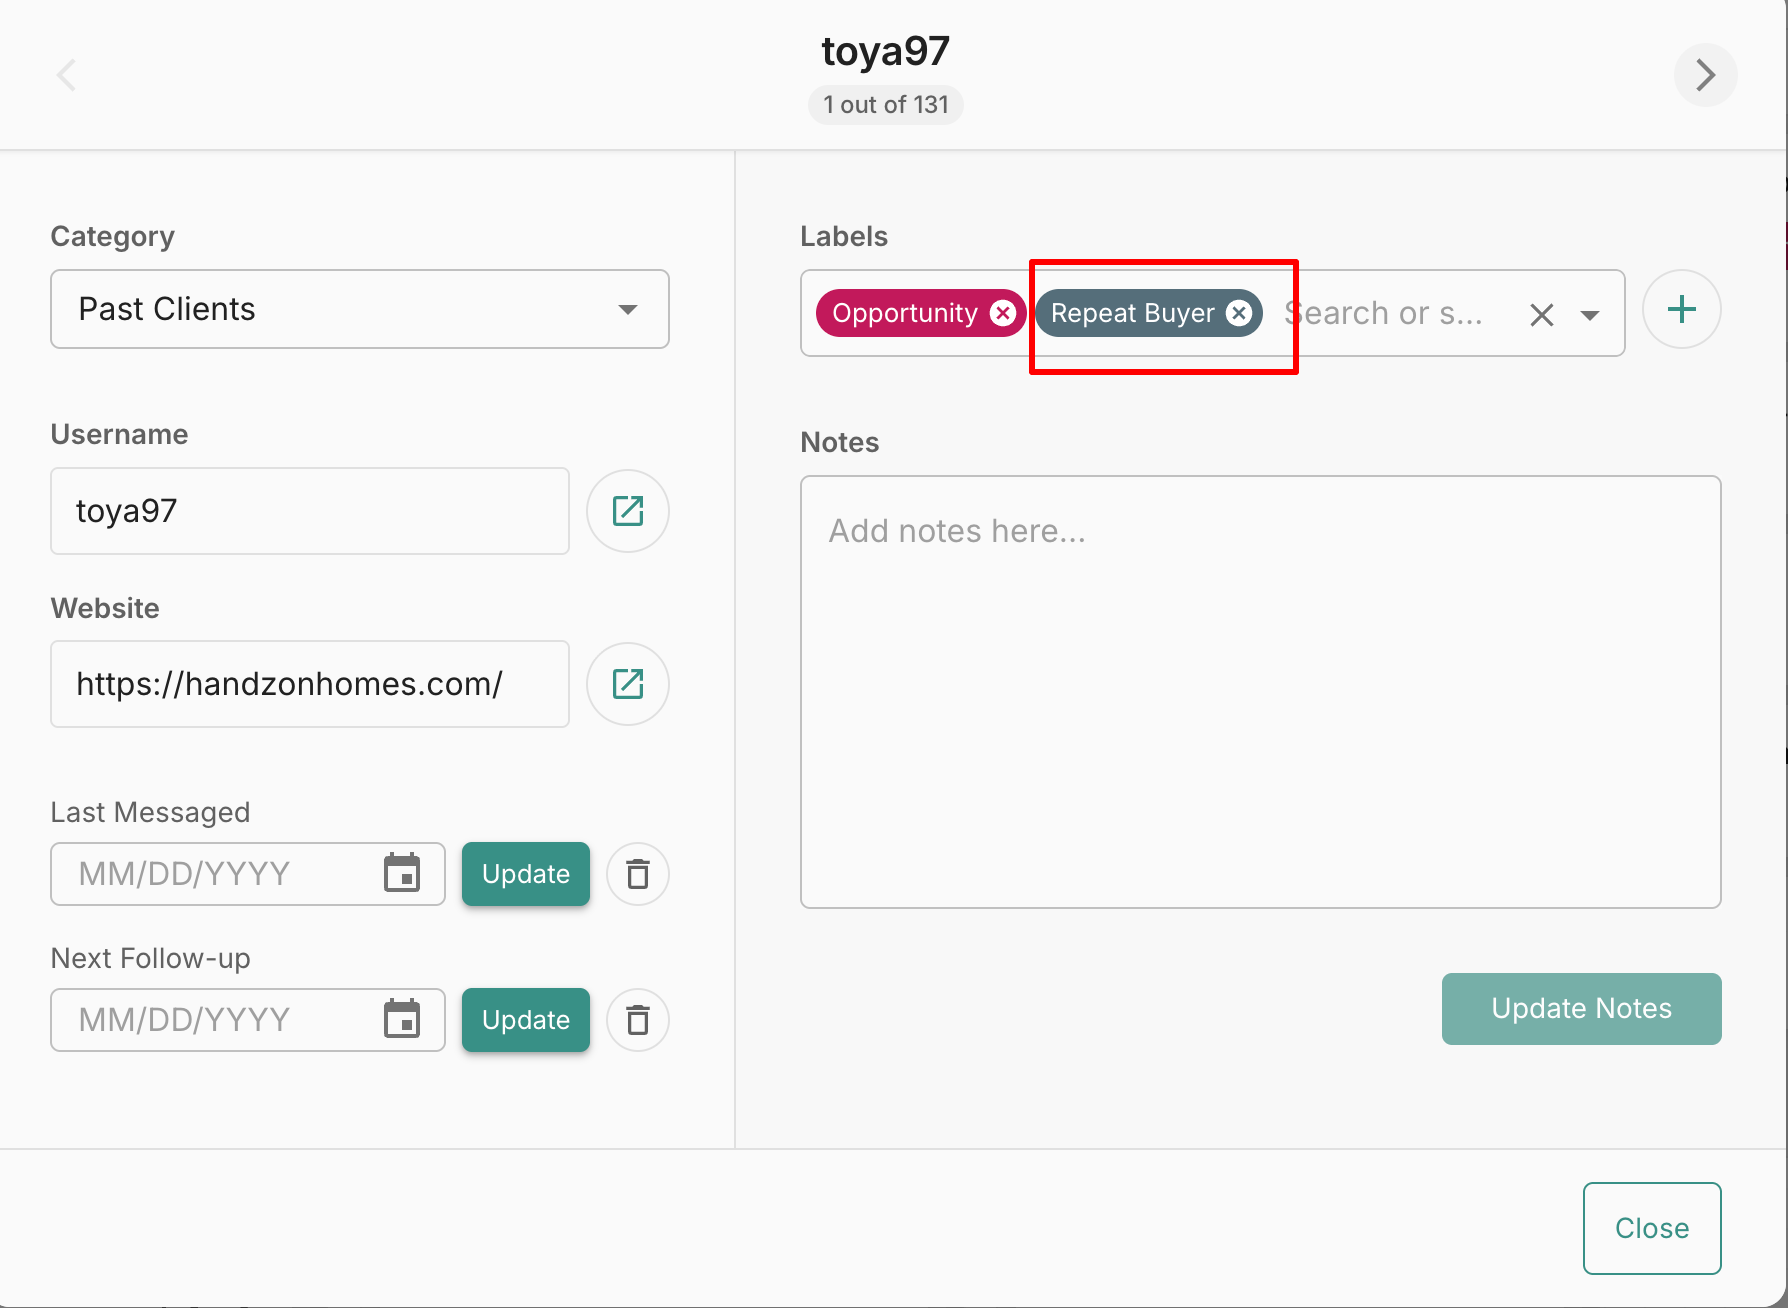
In CRM: - Move client to Past Clients
- Add tag: Repeat Buyer

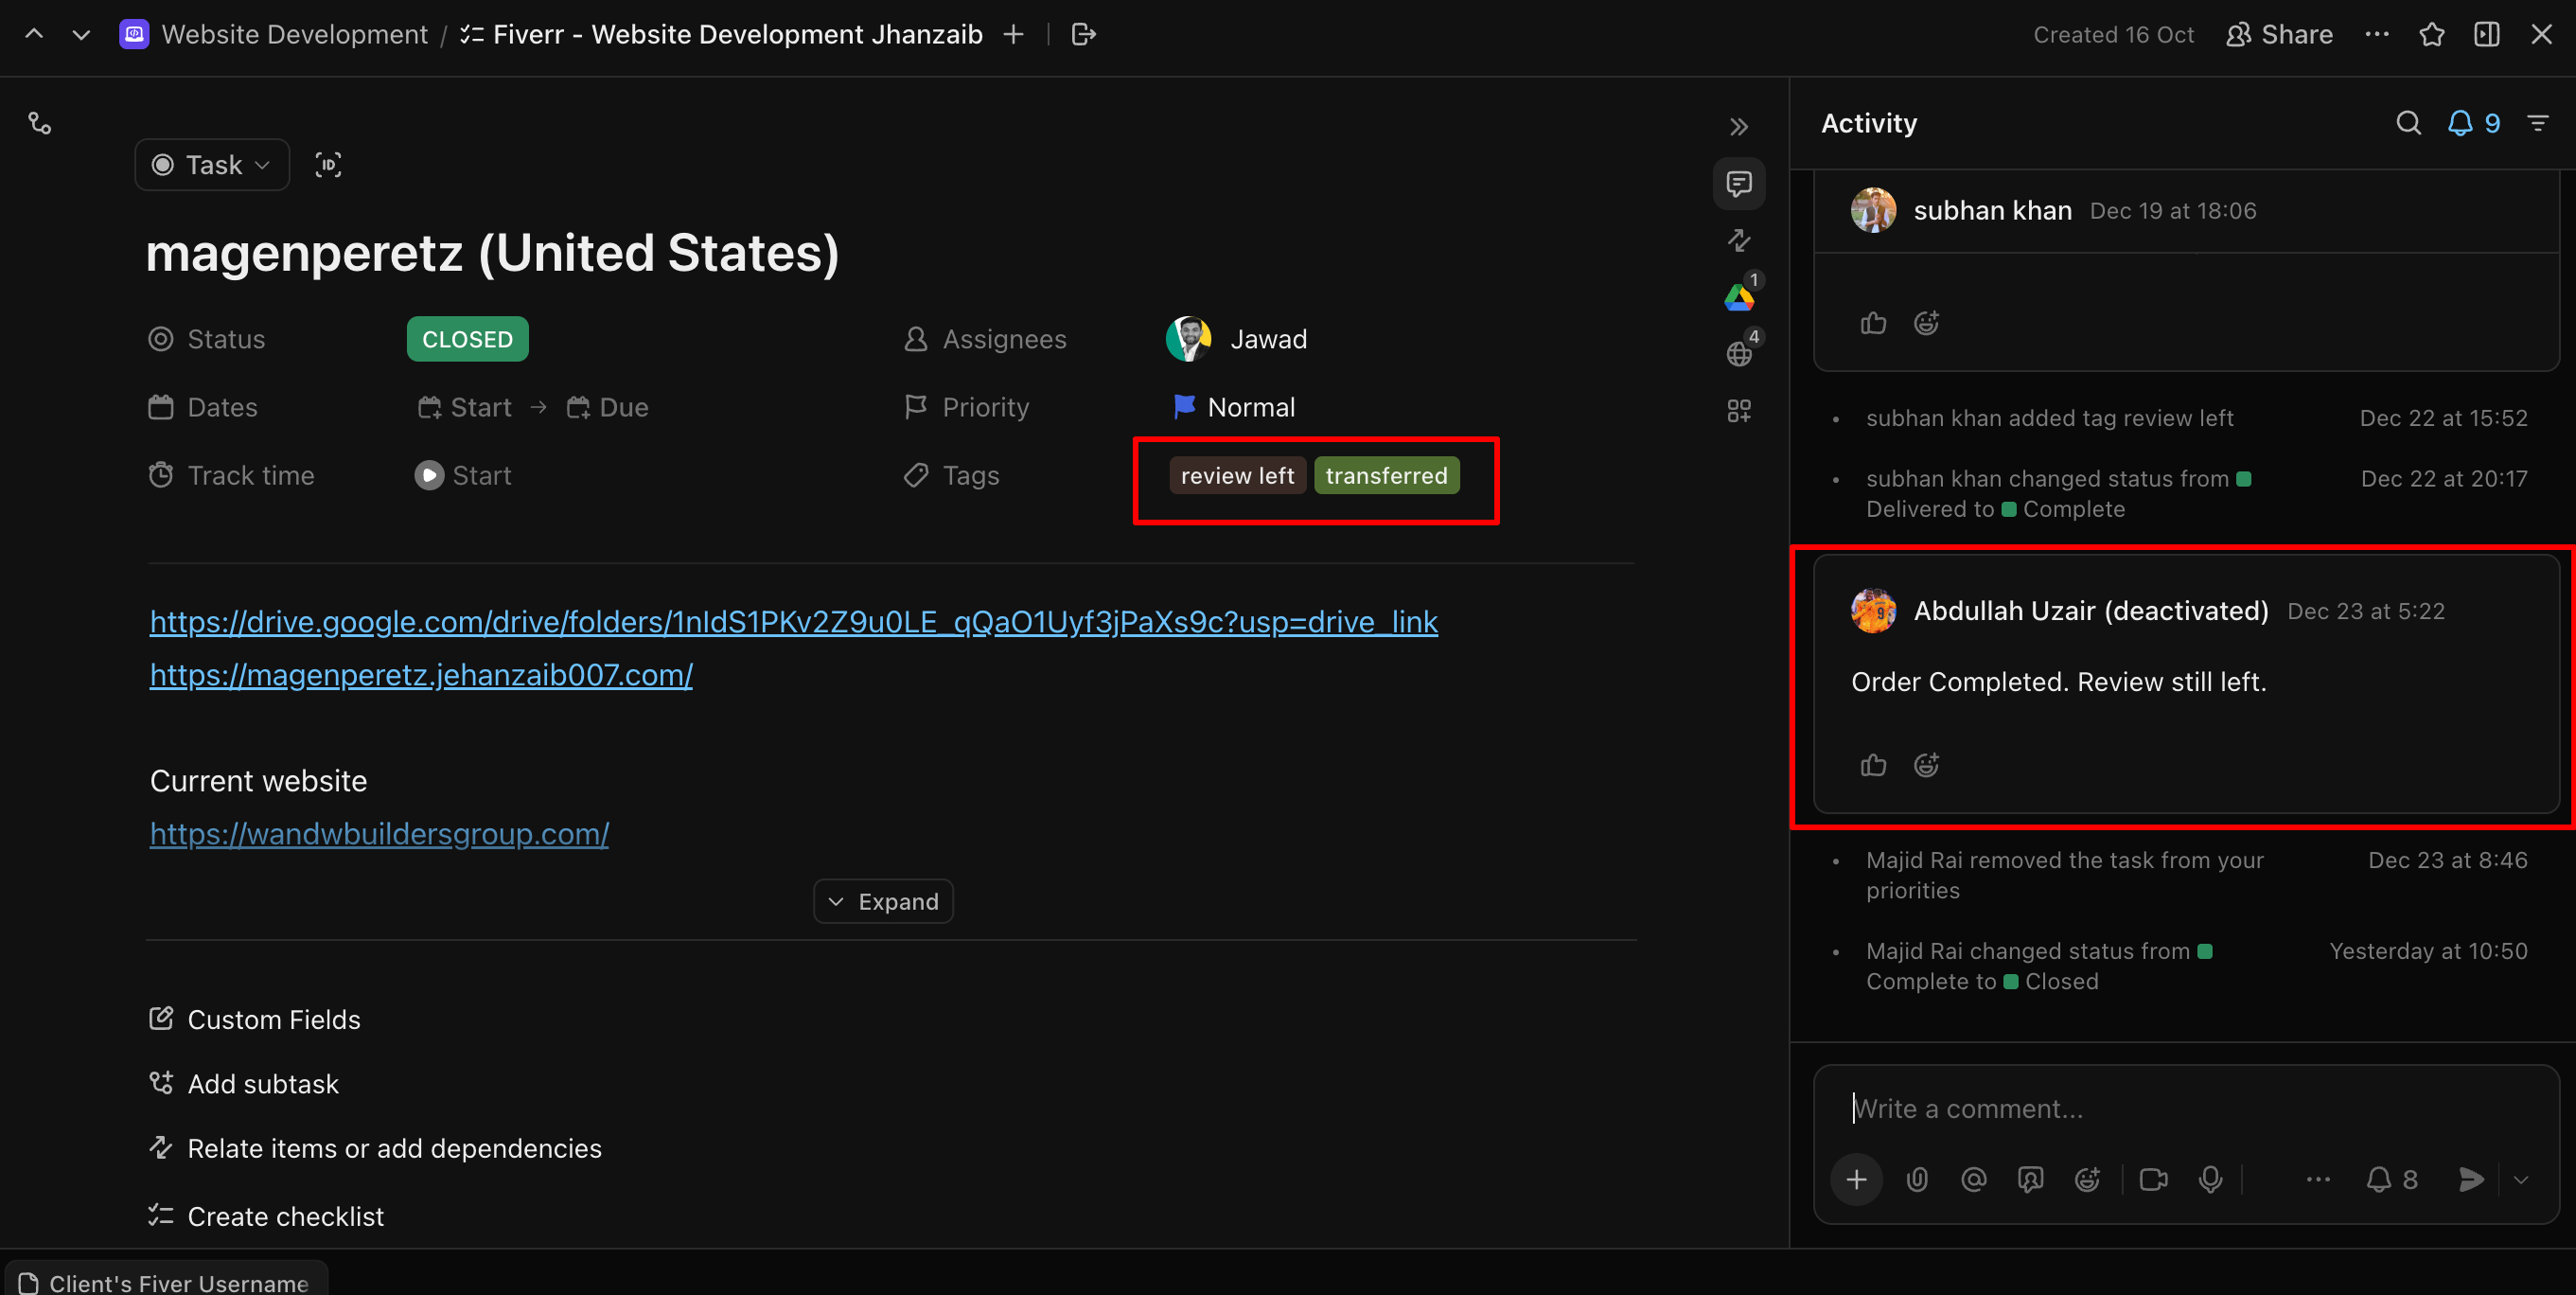
⚠️ Case 2: Client Does NOT Leave a Review
- Update ClickUp status:
- Delivered → Completed
- Add tag: Review Left
- Add activity note: <—— Completed by Client (Review Left) ——>

- On Discord:
- Use command: /reviewleft

- Use command: /reviewleft
- In CRM:
- Move client to Review Left category

- Add order completion date in Notes (exact format copied from Fiverr):

- Move client to Review Left category

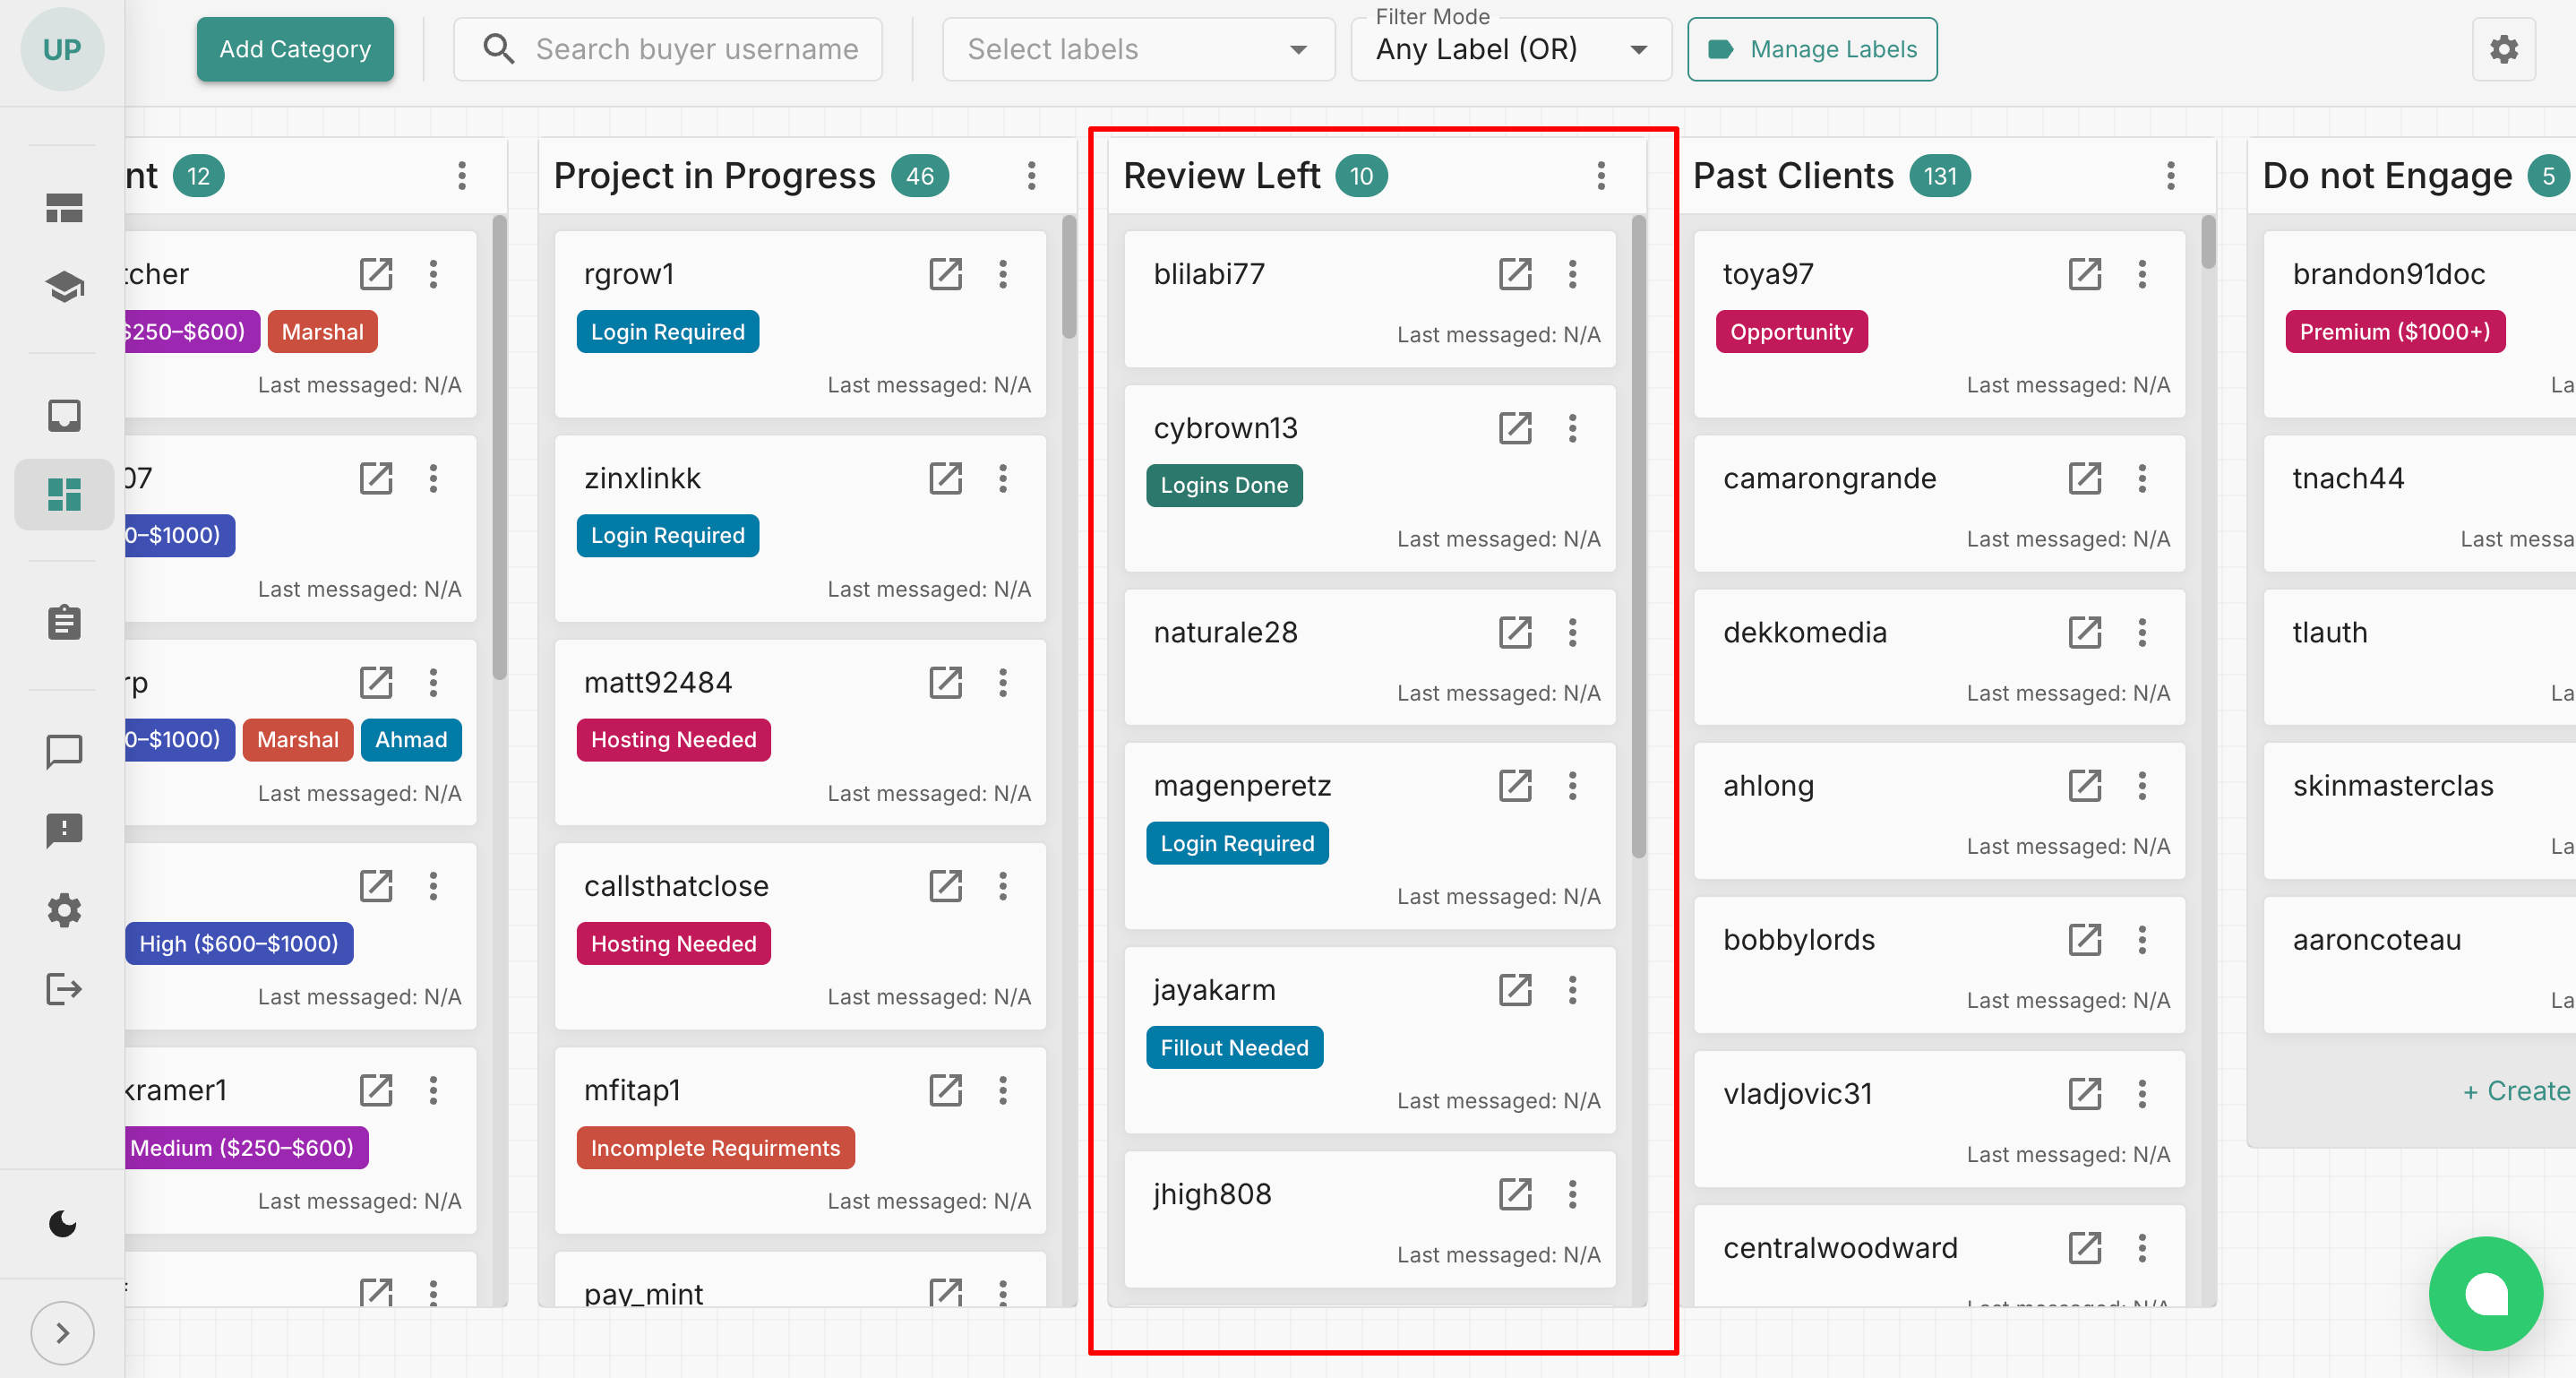
The order was completed 25 Dec 2025, 15:33

- Client will be followed for 30 days as per Follow-Up SOP
📌 Review tracking must NOT mix with past clients.
🧠 Key Understanding
Quality work alone is not enough.
Clear communication + proper verification + respectful closing
= Happy client + better reviews + repeat business.
🟡 Golden Rule
A project is only complete when the client confirms it — not when we think it is.
Guide on steps after project automatic completion
-
Step 1: Send message to client
"The order was auto-completed, but no worries! If you need help, you can still message me here anytime. 😊"
Step 2: Update ClickUp status based on project stage
-
Change from Delivered to Complete if everything is done and the website is transferred.
-
Change to Waiting for Transfer if website transfer is still pending.
-
Change to Waiting for Changes if changes are still in progress, specifying the type of changes.
Step 3: Add tag "Review Left" to client in ClickUp
Step 4: Add tag "Review Left" to client on Fiverr
Step 5: Update Discord with project automatic completion
Add tag "autoaccept" with status message:
"DELIVERY ACCEPTED – AWAITING REVIEW
The client has accepted the delivery but has not yet provided a review.
--------------------------------------------"
Step 6: Send final message to client
"As our website updates are almost complete! Let me know if you have any final tweaks. If all looks good, we can move ahead with the transfer to your domain so you can go live. Excited to get this launched for you!Looking forward to your go-ahead."
-
SOP – Client Referral System (Post-Project)
🎯 Objective
Create a consistent, non-pushy referral system that maximizes high-quality referrals from satisfied clients after project completion.
This SOP ensures referrals are asked at the right time, with the right message, and tracked properly.
🧱 Scope
Applies to:
- All completed Fiverr projects
- All direct / off-platform clients
- Website design, redesign, and development services
🧠 Core Principle
Referrals work only when timing, simplicity, and reward are aligned.
Never ask randomly. Never ask emotionally. Always ask systematically.
⏱️ When to Ask for Referrals (Non-Negotiable)
Ask for referrals ONLY when all conditions are met:
- Project is delivered and accepted
- Client is satisfied (positive feedback or review)
- No pending revisions or complaints
🚫 Never ask during revisions or delays.
🎁 Referral Reward (Standardized)
Use one clear reward only:
- 🎯 $50–$100 OFF next service
OR - 🎯 Free value-based add-on (speed optimization, SEO setup, extra page)
⚠️ No cash payouts unless approved.
💬 Approved Referral Message (Primary)
Send immediately after project acceptance:
I’m really happy to hear you’re pleased with the website — working with you has been a great experience 😊
I’m glad we could build a solid business relationship together.
Most of our projects come through word-of-mouth, so I wanted to ask —
if you know anyone who’s looking for a new website or a redesign, I’d truly appreciate an introduction.
As a small thank-you, I offer a 10% discount on your next project for every successful referral.
No pressure at all — just sharing this while everything is fresh.
And of course, I’m always here if you need anything.🔁 Make Referring Easy (Mandatory)
Always include a ready-to-forward message:
Hi, I recently worked with Jehan from Fiverr on my website and had a great experience.
The communication was smooth, the work was professional, and the final result turned out really strong.
You can see my website here:
👉 [Client Website Link]
Jehan is a Top Rated Seller on Fiverr, has 6+ years of experience, and has completed 2500+ website projects for clients worldwide.
If you’re looking for a reliable Website Developer for a new website or redesign, you can check him out here:
👉 https://www.fiverr.com/jehanzaib_007/This removes friction and increases referral rate.
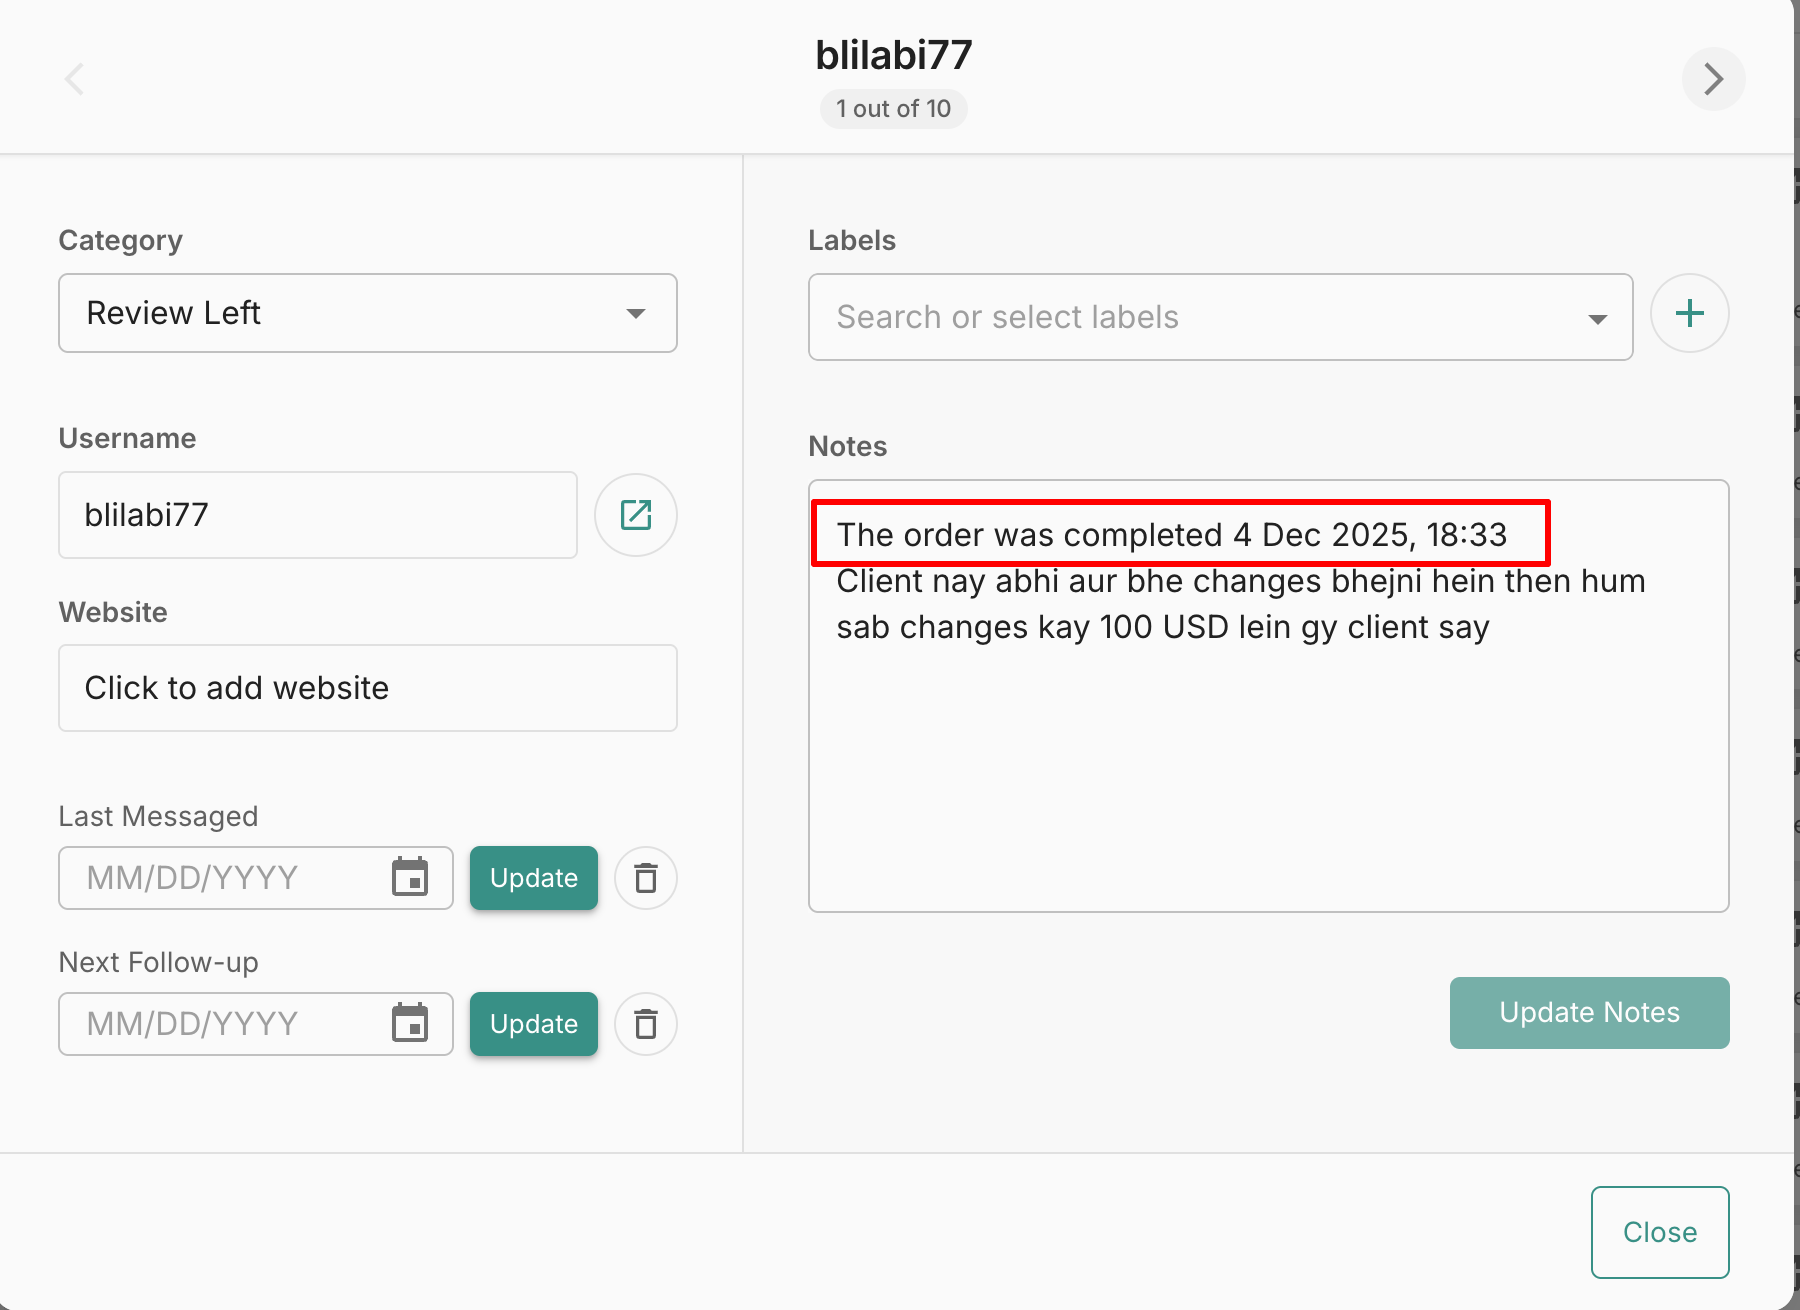
📌 Referral Tracking Procedure (Mandatory)
When a new client confirms they were referred:
- Confirm the Source
- Ask clearly: “Who referred you to us?”
- Do not assume or guess.
- Update CRM Record
- Add the client’s username in the CRM
- Apply the label: Referral
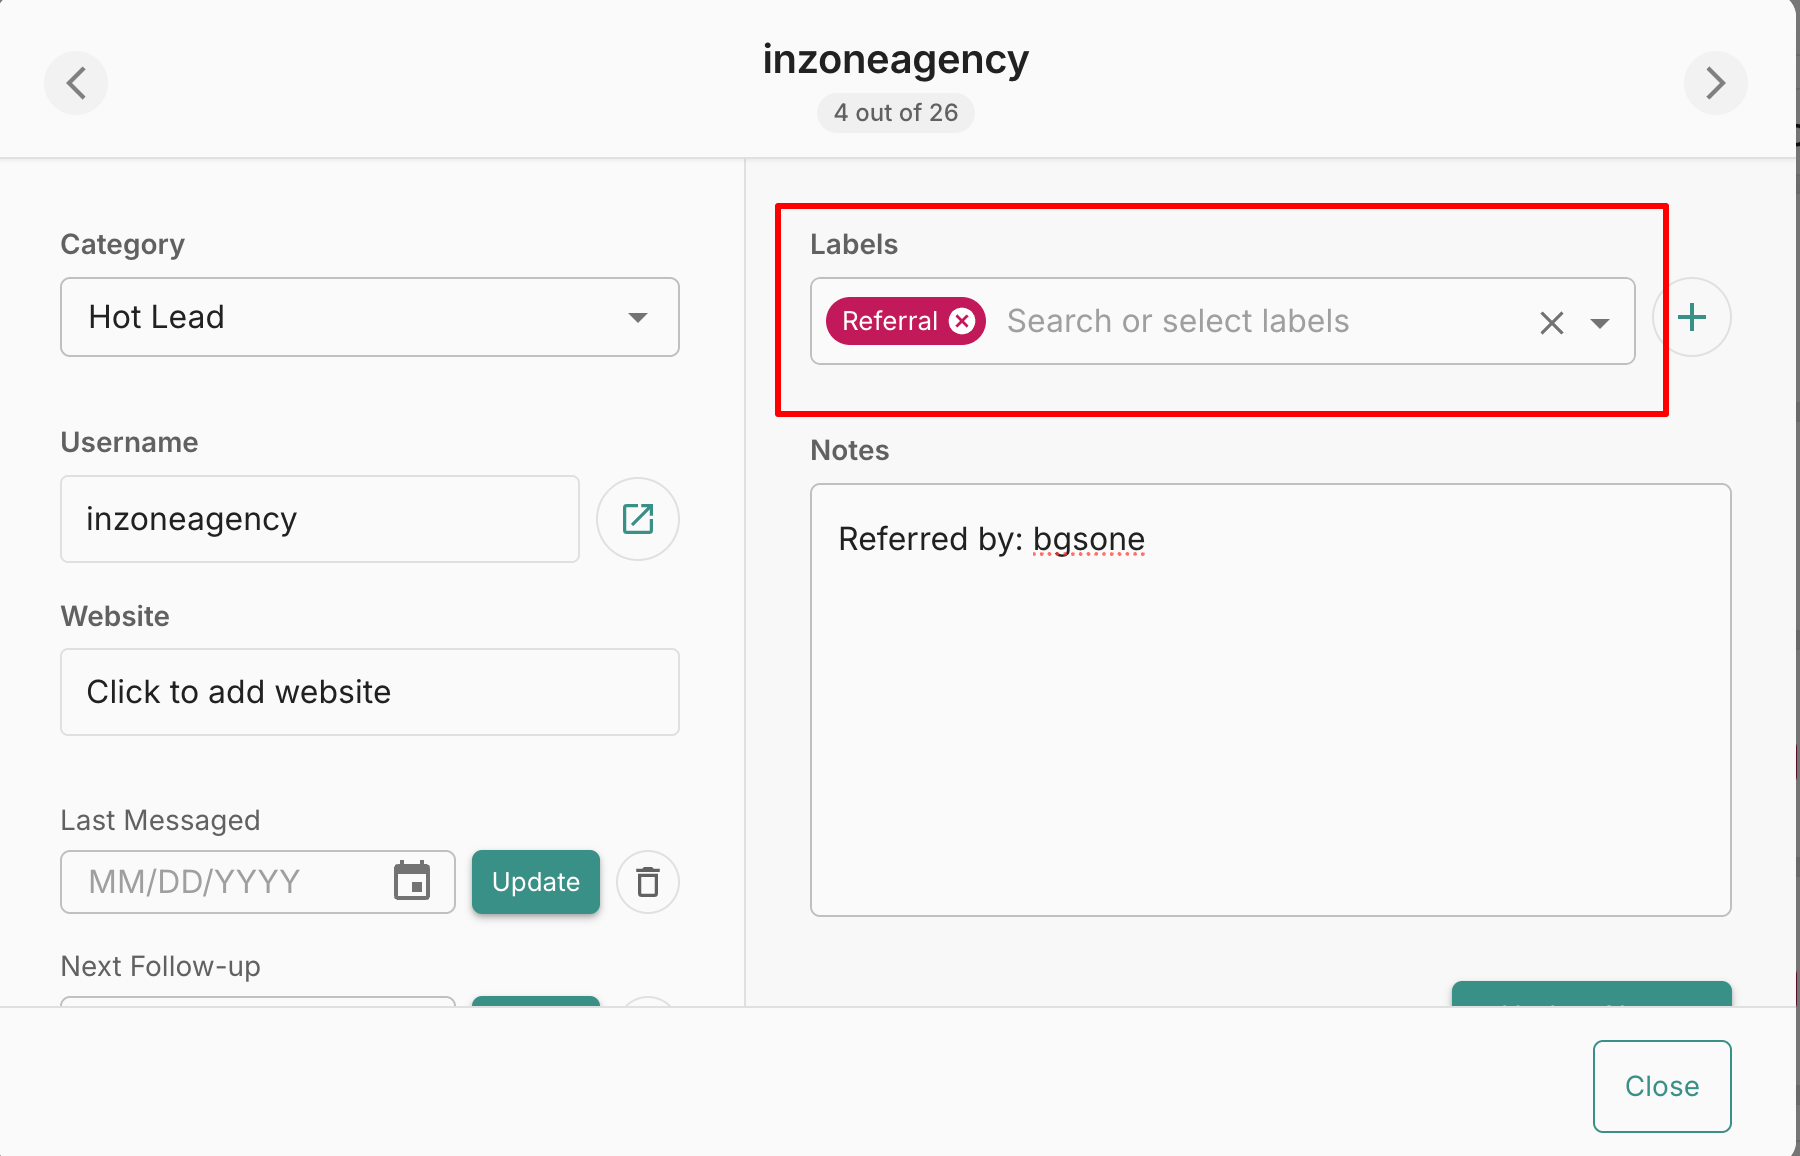
Referred by: [Referrer Name / Username]
🚫 Non-Negotiable Rule
If the referral source is not logged in the CRM, the referral does not exist.
No tracking = no rewards = system failure.
❌ Forbidden Language (Never Use)
Do NOT say:
- “Please help me”
- “It would mean a lot”
- “I’m struggling for clients”
- “Can you do me a favor”
This reduces perceived value.
🟡 Golden Rule
Referrals are asked at the moment of highest trust — not randomly, not emotionally.
This SOP protects brand value and compounds growth.