# Daily Tasks Guide - How To Do Daily Tasks
# How to upload a project
- Create a new project on ClickUp with the name of the client Name with Country Like Name (Country)
- Create a folder with the client name in this account drive (smtp…) and paste this folder link to the click-up description section as shown in the photo.
- Take screenshots of all chats of the client bout conversion and order chat download and download all the images, videos, and files from the client chat.
- Upload all the data to the drive must use this account (SMTP…) when uploading the data to the client folder.
- Create a subdomain with the same name that we use for click-up and paste links in the clickup description section as shown in the photo.
- Upload client logins to the Client Login list.
- Upload client inspirational website links at the bottom of the click-up description as shown in the photo.
Note: Use the same format in the description section whenever uploading the project. As shown in the photo.
[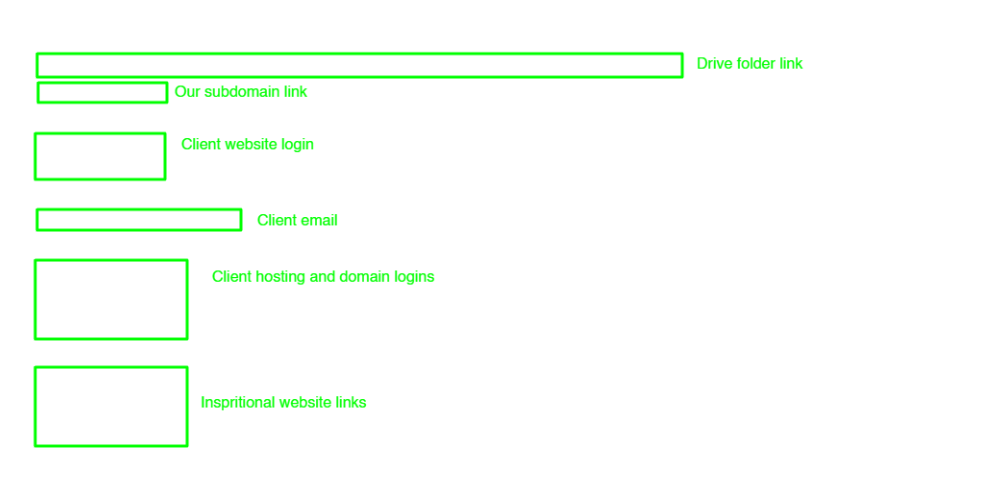](https://wiki.jehanzaib007.com/uploads/images/gallery/2025-11/image.png)
- Send all the important links to the Discord Activity section that are difficult to copy from screenshots and other important links.
- Send if have done meeting. all the meeting links to the Discord Activity section.
- Update the order date on ClickUp if the order is in progress.
- Set the priority tag with the help of the Order Tag SOP’s.
**Changes the status of that project with the help of Order Status SOP’s.**
# How to Start or Create a New Project | Step-by-Step SOP
### **Purpose**
This SOP outlines the step-by-step process for uploading a new client project. It ensures that every project is properly documented, organized, and tracked from the beginning, maintaining consistency and data security across all team members.
---
## **1. Requirements Checklist**
Before starting the project upload process, make sure you have collected the following items from the client:
- ✅ **Inspirational Website(s)** (reference links or design examples)
- ✅ **Logo** (in PNG, SVG, or vector format)
- ✅ **Content** (text, images, and any brand material)
- ✅ **Login Details** (WordPress, hosting, domain, or cPanel)
- ✅ **Total Pages and Their Names** (complete sitemap if available)
- ✅ **Any Specific Notes** (special requests, colors, fonts, or functionality)
Ensure all of these materials are complete before proceeding.
---
## **2. Project Uploading Steps**
### **Step 1: Create a New Project in ClickUp**
- Open ClickUp and create a **new task/project**.
- Use the following naming format:
**Client Name (Country)**
*(Example: John Smith (USA))*
- Add the project under the appropriate workspace or list (e.g., “Active Projects”).
---
### **Step 2: Create a Folder in Google Drive**
- Log in to the official **SMTP Drive account** (company-managed Google Drive).
- Create a new folder using the same name as the ClickUp project.
*(Example: John Smith (USA))*
- Copy the folder link and paste it in the **ClickUp Description section** — as shown in the reference photo.
- This folder will contain **all client files, media, and communication records.**
---
### **Step 3: Collect and Upload All Client Data**
- Take **screenshots of all client chats**, including conversion and order chat.
- **Download all images, videos, documents, and other files** shared by the client.
- Upload everything to the client’s folder in the **SMTP Drive account**.
- Double-check that all files are uploaded correctly and organized in labeled subfolders (e.g., “Logo,” “Content,” “References”).
---
### **Step 4: Create a Subdomain for the Project**
- Create a **new subdomain** using the same name used in ClickUp.
*(Example: johnsmith.youragencydomain.com)*
- Upload the project files or WordPress installation to this subdomain.
- Paste the subdomain link in the **ClickUp Description section** below the Drive folder link (as shown in the reference photo).
---
### **Step 5: Add Client Login Details**
- Add the **client’s login credentials** (WordPress, hosting, or domain) to the **Client Login List** spreadsheet or document.
- Ensure the credentials are stored securely and accurately.
---
### **Step 6: Add Inspirational Website Links**
- At the bottom of the ClickUp description section, paste the **inspirational website links** shared by the client.
- Follow the same structure shown in the reference photo to maintain consistency.
---
### **Step 7: Update Discord Activity Section**
- Go to the **Discord Activity channel**.
- Send all important links that are difficult to copy from screenshots (e.g., Drive folder, subdomain, or project file links).
- If a meeting was held with the client, also send the **meeting link and notes** to the Discord Activity section for tracking.
---
### **Step 8: Update Project Information in ClickUp**
- Update the **order date** in ClickUp if the order is still in progress.
- Set the **priority tag** following the **Order Tag SOP.**
- Update the **status** of the project according to the **Order Status SOP.**
---
## **Important Notes**
- Always use the same **description format** inside ClickUp as shown in the reference image.
- Ensure all uploaded materials are stored under the official **SMTP Drive account** only.
- Maintain a professional and organized structure for every project — no personal accounts or local storage should be used.
- Double-check all links (Drive, subdomain, etc.) before marking the project as uploaded.
# How to transfer a website
**Subdomain**
- Step1-Delete plugin Envato elements Also save the template kit name to ClickUp
- Step2-Checking favicon
- Step3-Tick the Checkbox from Setting -> Reading Settings -> (Discourage search engines from indexing this site)
- Step4-Back-up (All-in-One WP Migration)->file->Export->download
**Client website**
- Step 1- (If the website is shown )Then Back-up (All-in-One WP Migration)->file->Export->download (If not any website on the client website then not necessary to make a backup)
- Step 2- Upload and Install (All In One Migration) plugin Note: Here use (ALL IN ONE 100GB) that we saved on our computer
- Plugins Name-(Big File Uploads)
- Step 4- Import the file that we download from our subdomain
- Step 5- Refresh and log in again with the username and password that was our Sundomain has (Marshal@007)
- Step 6- Update permalinks from the setting
- Step 7- UnTick the Checkbox from Setting -> Reading Settings -> (Discourage search engines from indexing this site)
- Step 8- Checking in incognito if not loading images or pages may be a case issue ( how to solve: install the plugin (file manager) delete file htaccess and then update Permalinks from setting It will be working)
- Step 9- Checking Email from the contact form page and change all our email using clients' email --- from -> Setting-> ( by using this address after URL eg, ---https://abc.com/wp-admin/options.php---
- Step 10- Delete all the extra Plugin, themes, posts, and pages from the trash
- Step 11- Installing security plugins ---> Wordfence, Enhancement, Itheme, wp-limit, Yoast SEO, and SMTP (only website that has contact form install smtp)
- Step 12- Update on ClickUp changes status and add tag name Transfer
- Step 12- At the time when we send login to the client add a new user and password
# How to close a project
**Project closing steps:**
- Confirm Login Details are saved (client website list) and make sure sent to client... [Login Details](https://docs.google.com/spreadsheets/d/1c-tHw7DAmn4_C1SWm_HODqMgJjPfzYT3G4S95difCxg/edit?usp=sharing)
- Make AllInOne Backup from the client's website and delete (All In One Plugin) If Clinte has changed the Login Make a backup from our subdomain
- Send backup to the client if the Review is done else save it on the computer and send him after the review time, which is 30 days. And assign a label (review left) to that client
- Changes labels on Fiverr As to (Marshal)
- Delete the Subdomain but first confirm you have made a backup of this same website may be from the client domain
- Change the label to close on Clickup.
[Client Website Logins List](https://docs.google.com/spreadsheets/d/1c-tHw7DAmn4_C1SWm_HODqMgJjPfzYT3G4S95difCxg/edit?usp=sharing) [Elementor Client List ](https://docs.google.com/spreadsheets/d/1gNy8eE8xzJ0nhb4m3FkoZsetP8bY64Pe6I2cOmyd7e0/edit?gid=0#gid=0)
# How To Get Review From Review Left Client & Update it Properly
# SOP – Handling & Uploading Client Changes (Revisions)
# **🎯 Objective**
Ensure **all client-requested changes** are:
- Properly documented
- Safely stored
- Clearly communicated
- Correctly tracked in ClickUp
No data loss. No missed instructions. No confusion.
---
## **🧱 Scope**
Applies to:
- All Fiverr website projects
- All revision / change requests (1st, 2nd, 3rd… onwards)
---
## **⚠️ Core Rules (Non-Negotiable)**
- ❌ Never overwrite old files
- ❌ Never rely only on chat memory
- ❌ Never skip screenshots
- ✅ Every change request must have its **own folder**
---
## **🧭 Step-by-Step Process**
### **🔹 Step 1: Create Changes Folder (Mandatory)**
In the project Google Drive:
- For first revision:
changes\_1
- For second revision:
changes\_2
- Continue sequentially:
changes\_3, changes\_4 …
🚫 Never rename or reuse an old changes folder.
[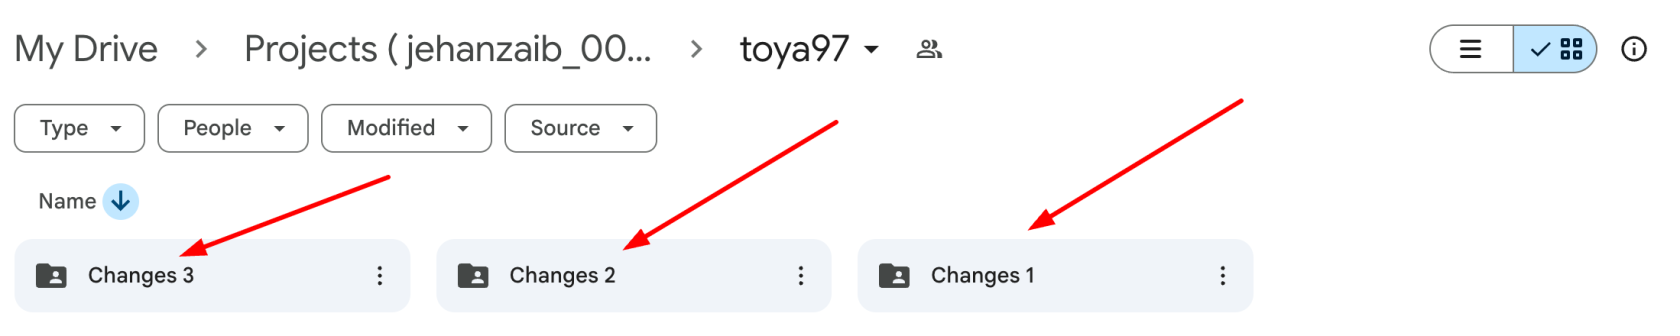](https://wiki.jehanzaib007.com/uploads/images/gallery/2025-12/BLl61MUpyjp3u9G7-image.png)
---
### **🔹 Step 2: Capture Client Messages (Proof Required)**
Take **screenshots** of:
- Fiverr **Order Chat**
- Fiverr **Inbox / Conversation Chat ( Using Go Full Page Extension. )**
These screenshots must clearly show:
- Client instructions
- Date & time
- Any links or files mentioned
📸 Screenshots are mandatory even if the message is “simple”.
[](https://wiki.jehanzaib007.com/uploads/images/gallery/2025-12/3LEMq1ZU8eX1rffv-image.png)
---
### **🔹 Step 3: Download All New Client Data**
Download **everything** the client sent, including:
- Images
- PDFs
- Docs
- Links (save in a text file if needed)
- Voice notes (if any)
🚫 Do NOT rely on external links staying active.
---
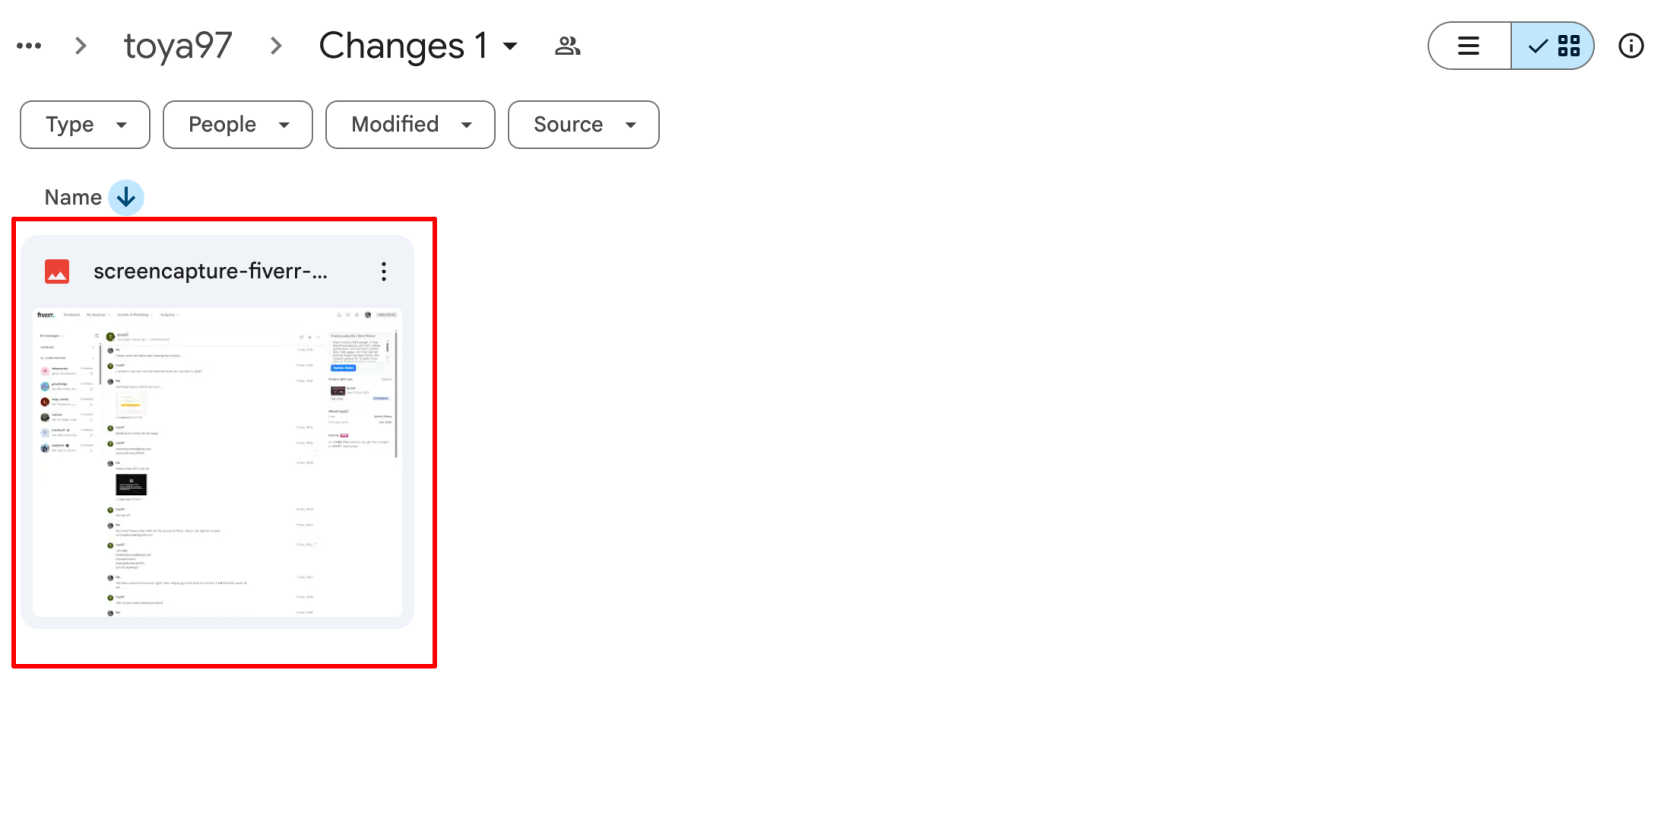
### **🔹 Step 4: Upload Data to Changes Folder**
Upload the following into the relevant changes\_X folder:
- All downloaded files
- All chat screenshots
- Any notes or clarifications (if required)
Upload using the Upastra Drive And client folder only **account only**
**(no personal accounts allowed).**
---
### **🔹 Step 5: Discord Update (Carl-bot – Mandatory)**
In the **client’s Discord thread → Activity section**:
- Use **Carl-bot quick commands only**
- Do **NOT** type manual messages
Use the command matching the change round:
/changes1 → First round
/changes2 → Second round
/changes3 → Third round
…
/changes10 → Tenth round
📌 Carl-bot already contains predefined messages.
**Rules:**
- Command number must match the Drive folder (changes\_1, changes\_2, etc.)
- Always use the next sequential command
- Never reuse or skip a number
🚫 If a change round is not logged via Carl-bot, it is **not considered an official revision**.
[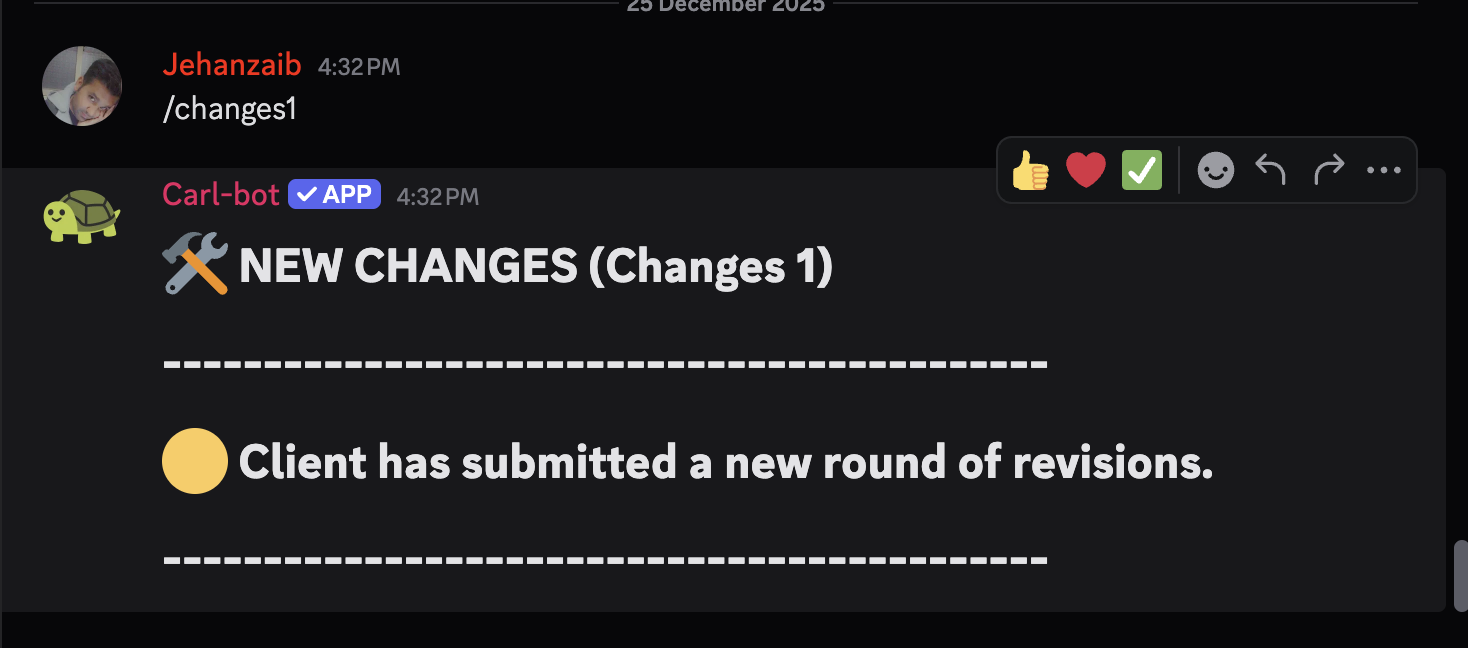](https://wiki.jehanzaib007.com/uploads/images/gallery/2025-12/duKYPCXnjiaTOA4k-image.png)
---
### **🔹 Step 6: Update ClickUp Activity**
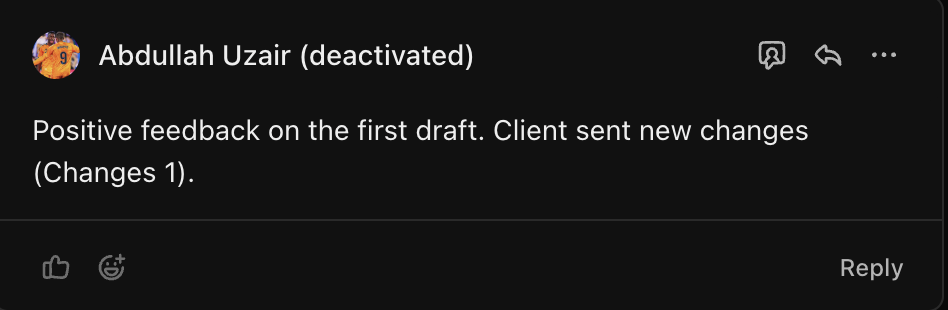
In the **ClickUp task → Activity / Comments** section:
- Add a short update: **Changes : 1 , Changes : 2**
**Note: For First draft reply also add the positive, negative or moderate feedback from the client based on the client messages.**
[](https://wiki.jehanzaib007.com/uploads/images/gallery/2025-12/92D2sEfQtc1V7OHR-image.png)
### **🔹 Step 7: Update Project Status**
Finally:
- Change the task status to:
##### **New Changes**
🚫 Do not move the status before all previous steps are completed.
#### **🔍 Quality Check (Before Status Change)**
Confirm all are done:
- - Changes folder created ✔
- - Screenshots taken ✔
- - Data downloaded ✔
- - Files uploaded ✔
- - Discord updated ✔
- - ClickUp updated ✔
**If even ONE item is missing → stop.**